Automating Scripture Quotes

Part of being a Mormon is regularly speaking or teaching in church. The official Gospel Library app makes it really simple to find resources to use in those talks and lessons. I like to have all of my content in markdown, which makes creating and referencing the content easy. But getting the quotes into markdown is not always easy. This morning, I created a few Workflow recipes to simplify the process.

The first workflow allows you to select any text in the Gospel Library app and extracts the web link and converts it. The link start as something like this:

[www.lds.org/scripture...](https://www.lds.org/scriptures/dc-testament/dc/130?lang=eng)

The workflow converts the link from a web link to a link that will open the Gospel Library app directly to the content. The converted link looks like this:

gospellibrary://content/scriptures/dc-testament/dc/130?lang=eng

Download convert link workflow

The second workflow builds on the first in some important ways. One of the most important pieces is grabbing the title and creating a formatted markdown link.

The other important piece is grabbing the verses and inserting them in the link if needed. As you might notice above, a link from Gospel Library will be to the chapter of scripture, but not the verses. One note here: if you are grabbing a link to content that does not have chapter and verses, the link will not be changed.

The markdown link looks like this:

[Doctrine and Covenants 130:18-19](gospellibrary://content/scriptures/dc-testament/dc/130.18-19?lang=eng)

Download markdown link workflow

Extracting the entire quote

The final piece is getting out the actual text of the quote. This last workflow uses the previous two in order to capture a formatted markdown quote. The output looks like this:

> 18 Whatever principle of intelligence we attain unto in this life, it will rise with us in the resurrection.
>
> 19 And if a person gains more knowledge and intelligence in this life through his diligence and obedience than another, he will have so much the advantage in the world to come.
>
> [Doctrine and Covenants 130:18-19](gospellibrary://content/scriptures/dc-testament/dc/130.18-19?lang=eng)

Download markdown quote workflow

All three workflows have to be downloaded and installed in order to get the final quote. When they are, it is just one touch to take selected text and get a nicely formatted quote.

18 Whatever principle of intelligence we attain unto in this life, it will rise with us in the resurrection.

19 And if a person gains more knowledge and intelligence in this life through his diligence and obedience than another, he will have so much the advantage in the world to come.

Doctrine and Covenants 130:18-19


Adding automation to open-source projects

One goal that I have had for all of my open-source projects is to have run automated builds and have complete test coverage. Achieving this goals is a slow process, but something that I have wanted to learn and get more comfortable with so that I can be more disciplined. I decide to post the build status and coverage data for all of my libraries on my site, to provide myself additional incentive to hurry and get everything updated.

At my day job, we are using Jenkins and Fastlane to run all unit and UI tests after every commit that is pushed, and to submit to iTunes Connect after every merge to master following a successful pull request. For my open-source libraries, I just wanted something to make sure that they build and run all the tests after changes. For now, I landed on using Travis to run the automated builds, and Codecov to collect coverage reports. I wanted to capture some of the process to be able to refer back to it, and hopefully it can help others with similar goals.

Steps

All examples are using my TextMagic framework. Remember to change the names to match your project.

  1. Set up Travis to start building your project
  2. Add travis.yml to project (see sample below)
  • Make sure to build either project or workspace, as needed
  1. Add slather.yml to to limit coverate reporting to Sources using Slather (see sample below)
  2. Include a call to Codecov after the build in Travis to collect code coverage information (see sample below)
  3. Test locally to make sure that it builds properly and then view the reports on Codecov
  • xcodebuild -workspace TextMagic.xcworkspace -scheme TextMagic -sdk iphonesimulator9.3 -destination="OS=9.3,name=iPhone 6S Plus" -configuration Debug GCC_INSTRUMENT_PROGRAM_FLOW_ARCS=YES GCC_GENERATE_TEST_COVERAGE_FILES=YES ONLY_ACTIVE_ARCH=YES test | xcpretty -c
  • slather coverage -s --scheme TextMagic --workspace TextMagic.xcworkspace/ TextMagic.xcodeproj/
  1. Push to GitHub, and make sure Travis builds successfully
  2. Include build and coverage information in your README.md file

<div class=“badges”> <a href=“https://travis-ci.org/benjaminsnorris/TextMagic"&gt;&lt;img src=“https://img.shields.io/travis/benjaminsnorris/TextMagic.svg" alt=“Build Status”></a> <br/> <code class=“highlighter-rouge”> Build Status </code> <br/> <br/> <a href=“https://codecov.io/gh/benjaminsnorris/TextMagic"&gt;&lt;img src=“https://img.shields.io/codecov/c/github/benjaminsnorris/TextMagic.svg" alt=“Code Coverage”></a> <br/> <code class=“highlighter-rouge”> codecov </code> </div>

Sample travis.yml file

language: objective-c

before_install:
  - gem install xcpretty --no-rdoc --no-ri --no-document --quiet
  - gem install slather

env:
  global:
    - LC_CTYPE=en_US.UTF-8
    - LANG=en_US.UTF-8
    - PROJECT_NAME="TextMagic"
    - WORKSPACE_SUFFFIX=".xcworkspace"
    - FRAMEWORK_SCHEME="TextMagic"
    - IOS_SDK=iphonesimulator9.3

matrix:
  include:
    - osx_image: xcode7.3
      env: DESTINATION="OS=9.0,name=iPhone 6S Plus"  SCHEME="$FRAMEWORK_SCHEME" SDK="$IOS_SDK"
    - osx_image: xcode7.3
      env: DESTINATION="OS=9.1,name=iPhone 6S"       SCHEME="$FRAMEWORK_SCHEME" SDK="$IOS_SDK"
    - osx_image: xcode7.3
      env: DESTINATION="OS=9.3,name=iPad Pro"        SCHEME="$FRAMEWORK_SCHEME" SDK="$IOS_SDK"

script:
  - set -o pipefail
  - xcodebuild -version
  - xcodebuild -showsdks
  - xcodebuild
    -workspace "$PROJECT_NAME$WORKSPACE_SUFFFIX"
    -scheme "$SCHEME"
    -sdk "$SDK"
    -destination "$DESTINATION"
    -configuration Debug
    GCC_INSTRUMENT_PROGRAM_FLOW_ARCS=YES
    GCC_GENERATE_TEST_COVERAGE_FILES=YES
    ONLY_ACTIVE_ARCH=YES
    test
    | xcpretty -c

after_success:
  - slather
  - bash &lt;(curl -s [codecov.io/bash](https://codecov.io/bash)) -J "$PROJECT_NAME" -f ./test_reports/cobertura.xml

Sample slather.yml file

# .slather.yml

coverage_service:   cobertura_xml
xcodeproj:          TextMagic.xcodeproj
workspace:          TextMagic.xcworkspace
scheme:             TextMagic
source_directory:   Sources
output_directory:   test_reports

Sample call to Codecov

bash &lt;(curl -s [codecov.io/bash](https://codecov.io/bash)) -J "$PROJECT_NAME" -f ./test_reports/cobertura.xml

Even though this call is included already in the sample travis.yml file, I want to explain it a bit more.

bash &lt;(curl -s [codecov.io/bash](https://codecov.io/bash)) downloads the latest script from Codecov.

-J "$PROJECT_NAME" specifies the packages to build coverage. This can significantly reduces time to build coverage reports.

-f ./test_reports/cobertura.xml targets the file that Slather created so that it is not searching for all reports.


Installing on iOS 10 with Xcode 7

Like many developers, I was anxious to install iOS 10 on my devices. This summer, I went all in and installed iOS 10 beta on my primary iPhone, iPad, as well as watchOS 3 beta on my Apple Watch. I have had remarkably few issues, but one of the major problems was installing apps that I still needed to work on that needed to be shipped before iOS 10 came out.

The problem

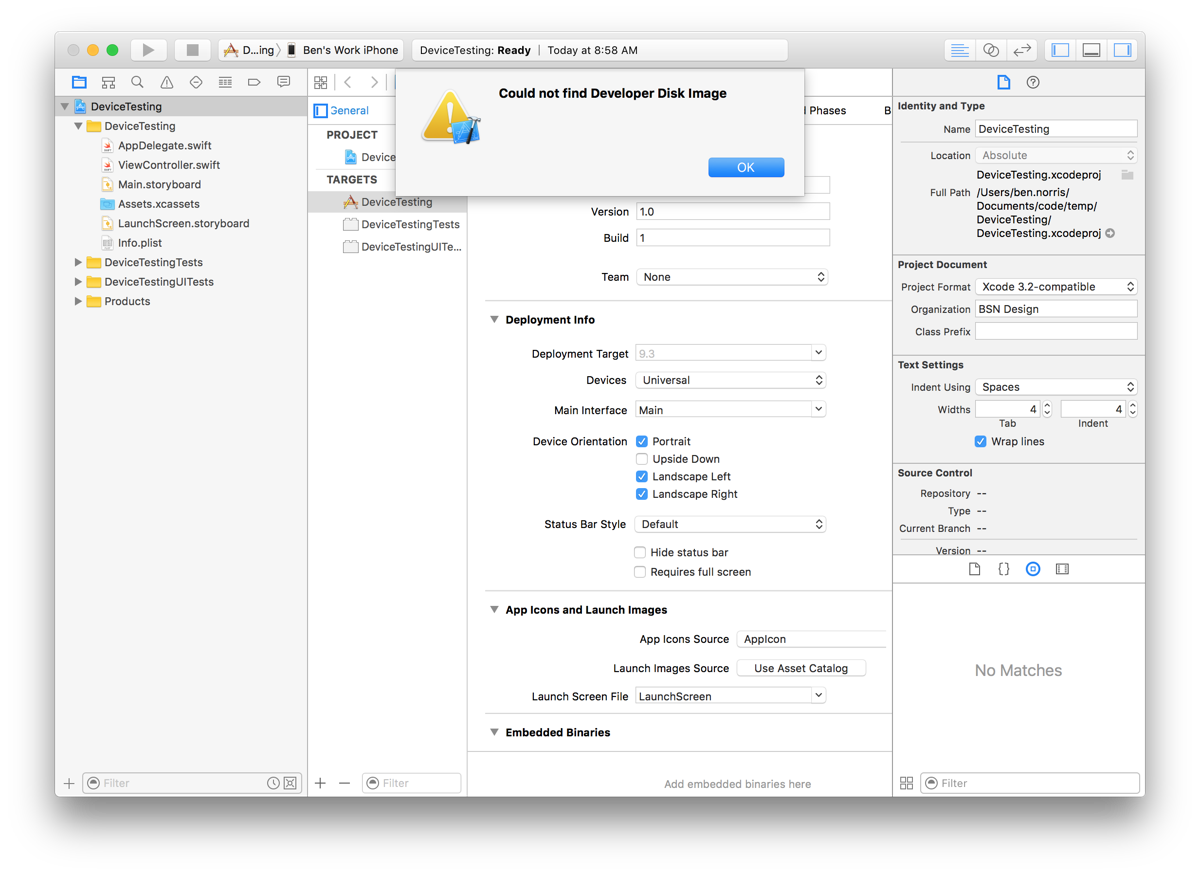
By default, you cannot install an app from Xcode 7 on a device running iOS 10. You will see an error that reads, “Could not find Developer Disk Image” as shown below.

Xcode 7 Error iOS 10

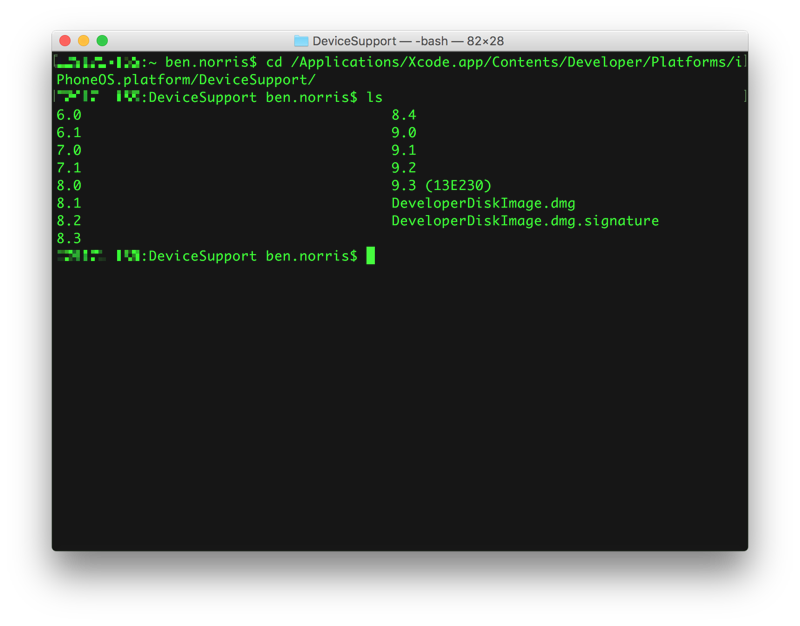
The problem is that Xcode 7 does not have support for iOS 10. Using Terminal, you can easily see which operating systems Xcode is able to support.

$ cd /Applications/Xcode.app/Content/Developer/Platforms/iPhoneOS.platform/DeviceSupport
$ ls
Xcode device support

The solution

In order for Xcode 7 to install apps on your device running iOS 10, you first need to make sure that it works with Xcode 8. Download the beta, and open a project with your device connected. Typically, you will need to wait for the symbol files to install, and then you should be able to install. In some cases, restarting your device is necessary, or even resetting the network settings (Settings -> General -> Reset -> Reset Network Settings).

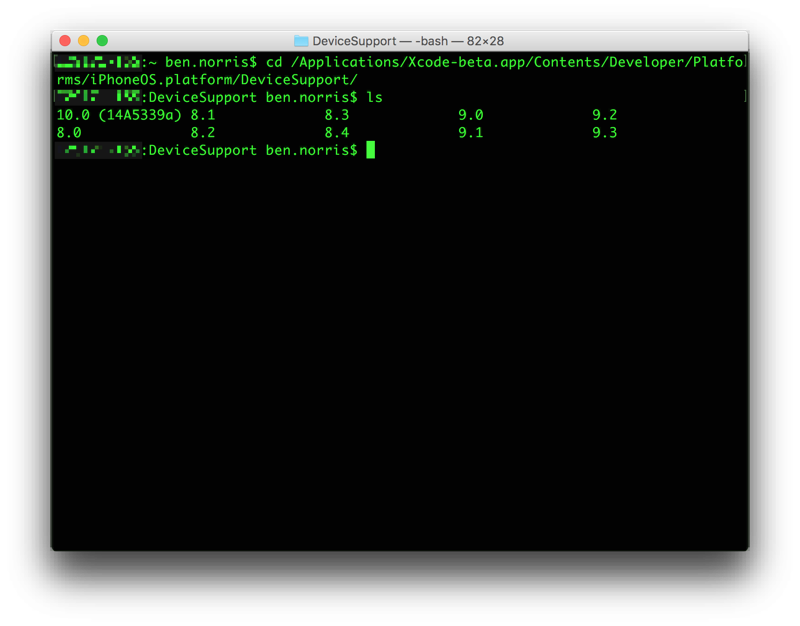
Once that it working, you can look in the Xcode beta device support folder to find iOS 10 support.

Xcode beta device support

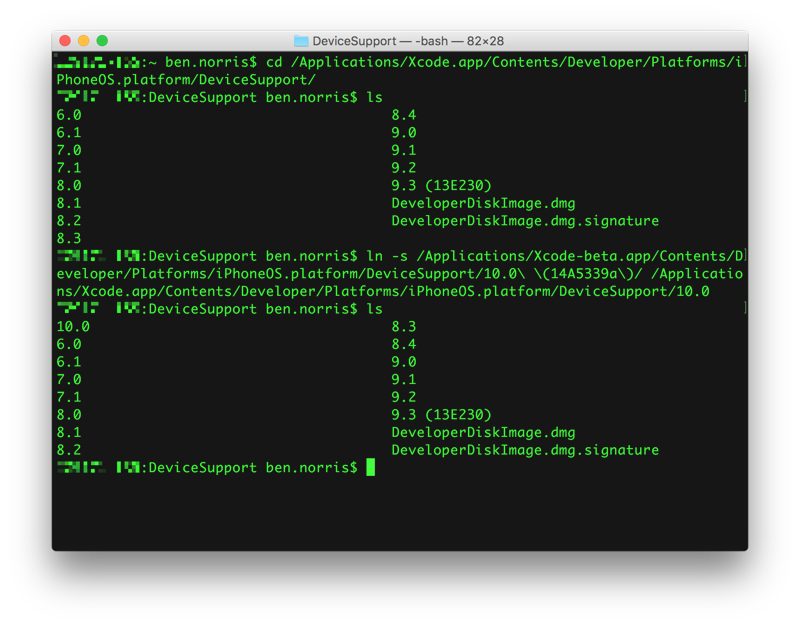
There are a couple options to give Xcode 7 the information that it needs. You could copy over the folder containing 10.0 support, but the simplest option is to create a symbolic link using the ln command in Terminal (documentation). As you type this out in Terminal, be sure to use Tab to help autocomplete the directory names in order to avoid typos. And naturally, if either Xcode app is in a different place, or the exact version of iOS 10 is different, you will make adjustments for your environment.

$ ln -s
   /Applications/Xcode-beta.app/Contents/Developer/Platforms/iPhoneOS.platform/DeviceSupport/10.0\ \(14A5339a\)/
   /Applications/Xcode.app/Contents/Developer/Platforms/iPhoneOS.platform/DeviceSupport/10.0
Xcode device support with link

After adding the link, you will need to quit and restart Xcode 7. Connect your iOS 10 device, and you should now be able to install and run your app!

Xcode 7 running on iOS 10

Retrieving iOS shared web credentials

The problem

One of the most annoying interactions with any app or service is logging in. None of us likes having to remember usernames and passwords, and often they are difficult to type in. Even if they are easy, it is never what you actually want to do. You are accessing an app or service in order to accomplish a task, and logging in is a barrier to success. However, none of us want to feel like our sensitive information is not secure, so logging in is something of a necessary evil.

The solution

One thing that you can do as a developer is to make this experience as simple and painless as possible. One option, which I plan to discuss in the future, is to integrate with 1Password. This is a popular password management app, and integration is quite simple.

Another approach is what I want to cover today: integrating with Shared Web Credentials, or from a user’s perspective, integrating with Safari saved passwords. This is available since iOS 8, and is an effective way to simplify life for your users. You should read the official documentation, but I will go through the steps that I did in order to retrieve passwords successfully. In a future post, I will address creating an account and saving a new password.

The steps

  1. Add entitlement and configure app
  2. Upload site association file to server
  3. Add password to Safari on Simulator or device
  4. Add code to retrieve password
  5. Run app

Entitlement

Xcode does a great job of simplifying the process of adding entitlements. In order to use shared web credentials, you need to enable the Associated Domains entitlement:

Associated domains

Then in place of example.com, you need to put your domain. Read through the documentation for this section to make sure that you do not miss anything.

Site association file

In order for the association to work, you have to upload a simple JSON file to your server. Even if you do not have a web app that users will sign in to, as long as you have a website for your app, you can upload the file and make it easier for your users to log in on additional devices. The file should be named apple-app-site-association with no extension, and is simple JSON. It should look like this:

{
  "webcredentials": {
    "apps": [
      "D3KQX62K1A.com.example.DemoApp"
    ]
  }
}

Inside the apps array, you should list all of the bundle identifiers for apps that should be able to share passwords from this site. The prefix to the bundle identifier is usually your Team ID. To be sure, pull up the app in developer.apple.com and copy the prefix from the App ID information.

App prefix

Safari password

Since we are focusing on retrieving passwords, and not saving them from the app, it will make testing easier to manually add the password to the device you are going to test on. I will include instructions for using the Simulator, but the same basic steps apply if you are using a physical device.

  1. Open the Settings app
  2. Tap on “Safari”
  3. Tap on “Passwords”
  4. Enter 1234 for the passcode
  5. Tap on “Add Password”
  6. Enter your website and a user name and password

Safari passwords

Code

There are many approaches to retrieving the shared password. The method I have chosen is to make the call to retrieve the shared password when the user taps on the username or password field in the login form. That way, it is not as jarring for the user when first navigating to the form, but it is still helpful at the moment the user wants to take action.

The actual code for retrieving the credentials is fairly simple. Here is an example with a completion closure that returns an optional username and password.

func requestSharedPassword(completion: (username: String?, password: String?) -&gt; ()) {
  SecRequestSharedWebCredential(nil, nil) { credentials, error in
    dispatch_async(dispatch_get_main_queue()) {
      guard error == nil else {
        completion(username: nil, password: nil)
        return
      }
      guard let unwrappedCredentials = credentials else {
        completion(username: nil, password: nil)
        return
      }
      let arrayCredentials = unwrappedCredentials as [AnyObject]
      guard let typedCredentials = arrayCredentials as? [[String: AnyObject]] else {
        completion(username: nil, password: nil)
        return
      }
      guard let credential = typedCredentials.first else {
        completion(username: nil, password: nil)
        return
      }
      guard let username = credential[String(kSecAttrAccount)] as? String,
                password = credential[String(kSecSharedPassword)] as? String else {
        completion(username: nil, password: nil)
        return
      }
      completion(username: username, password: password)
    }
  }
}

func textFieldDidBeginEditing(textField: UITextField) {
  requestSharedPassword { username, password in
    guard let username = username, password = password else { return }
    usernameField.text = username
    passwordField.text = password
    self.submit()
  }
}

Execution

Finally, with the code in place, you can run the app again. When the user taps in the username or password field, call your requestSharedPassword function, and if everything is set up properly, you will see something like this example from an app I am currently working on:

Shared credentials

Summary

And that is it! These steps really are simple and straightforward, but the effect on the user experience of your app is tremendous.


Fixing local problems with a Carthage version number

As I discussed previously, we are using Carthage and Git submodules to manage our dependencies. Since many of the frameworks that we are pulling in are frameworks that we are writing, we sometimes run into an issue where we have changed the version number of a release for a framework to be the same as a previous version. This does not happen often, but can happen if you have made a release, and then later deleted the release and the tag and made a new release pointing to a different commit.

The problem is that when you update a framework via a Carthage dependency, a local cache of the repo is saved, along with the version number tags. If you change your Cartfile to reference a version number that was previously downloaded, Carthage will use the locally cached version instead of getting the latest update from GitHub.

Solution

  1. Using Terminal, navigate to the Carthage cache.
  • cd /Users/[username]/Library/Caches/org.carthage.CarthageKit/dependencies
  1. Remove the directory matching the framework that you need to force to download.
  • rm -rf FrameworkName/
  1. Back in your project directory, update again from Carthage.
  • carthage update --no-build --use-submodules
  • Edit: carthage checkout works better for this. Thanks Tim Shadel!

Summary

Your framework will download from GitHub at whatever version number you have specified, and you should be set. This is mostly a reference for myself for the next time that I need to remember how to do this, but hopefully it can help you as well.


Using Carthage to add third-party code

In almost every project that I create, I bring in frameworks and libraries. After trying a number of different approaches to make this easier, I have landed on a system that uses Carthage, and Git submodules. The system basically comes from a post by Bart Whiteley, but I wanted to record all of the steps so that I have them in one place for my own reference.

The advantage of this system that you have all the control of submodules, while having the ease of using Carthage to keep dependencies in sync. You can easily change the version number of the dependencies in Carthage, and then commit the update to the submodule, making it easy to work across teams.

Pre-requisites

  1. Create a workspace with your project included.
  2. Set up a Cartfile with your dependencies.
  3. In Terminal, run the command carthage bootstrap --no-build --use-submodules.
    • Make sure that you have carthage installed (documentation).
    • This will clone or fetch all of your dependencies, and check them out as git submodules in your project
    • Note: You only need to run bootstrap once in your project. After that, you will run carthage update --no-build --use-submodules.

Bringing in a dependency

  1. Find the FrameworkName.xcodeproj file for the dependency in .Carthage/Checkouts and add it to your workspace.
    • Make sure that you drag the project to the far left so that it becomes a workspace project instead of a subproject under an existing project.
  2. In the General tab of your app target, add the framework to “Linked Frameworks and Libraries” by searching in the workspace.
  3. The framework should show up in your Project Navigator. Drag it to a folder according to your project organization.
  4. Add the same framework to “Embedded Binaries” in the General tab.
  5. This will probably create a duplicate entry in “Linked Frameworks and Libraries” which you should remove.
  6. Select the framework in the Project Navigator, and change the Location to “Relative to Build Products” in the File Inspector panel on the right.
  7. Edit your project file (ProjectName.xcodeproj/project.pbxproj) in a text editor.
    • In the PBXFileReference section, find the entry for your framework.
    • Edit the path property to be simply FrameworkName.framework. You will probably be removing a long, absolute path reference.
    • The sourceTree property should be set to BUILT_PRODUCTS_DIR.
  8. In the Build Settings tab of your app target, find the “Framework Search Paths” option. An entry pointing to the framework in .Carthage/Checkouts has probably been added, which you should remove.
  9. Build the project and make sure there are no errors.

Additional information

When someone else checks out the project, it is not necessary to run any carthage commands. Instead, they will update the submodules. This can be done in Terminal, if needed, using git submodule update --init.

Conclusion

It is always a challenge to find the best way to incorporate third-party code in a consistent, repeatable way that works well for individual developers as well as automated build systems. This has worked well for us, and hopefully will help you and your team as well.