Thoughts on Peers 2018

I am lucky enough at work to be able to choose a conference every year to attend for professional development. This year, the five of us iOS developers decided we wanted to find a conference that would give us a slightly different perspective than we usually get, and one that we could all attend together. After hearing Peers mentioned both on Core Intuition and Release Notes, a couple of the only tech podcasts to survive my latest purge, I proposed that we all head to Austin.

To be honest, we did not expect the content to be completely relevant for us. We recognized that Peers is primarily a web and business conference, and we all work as iOS developers at a large enterprise company. But since we are all involved with our company’s efforts to expand our business and start new ventures, we want to keep in touch with the startup and independent developer culture and try to embody some of that inside of our company.

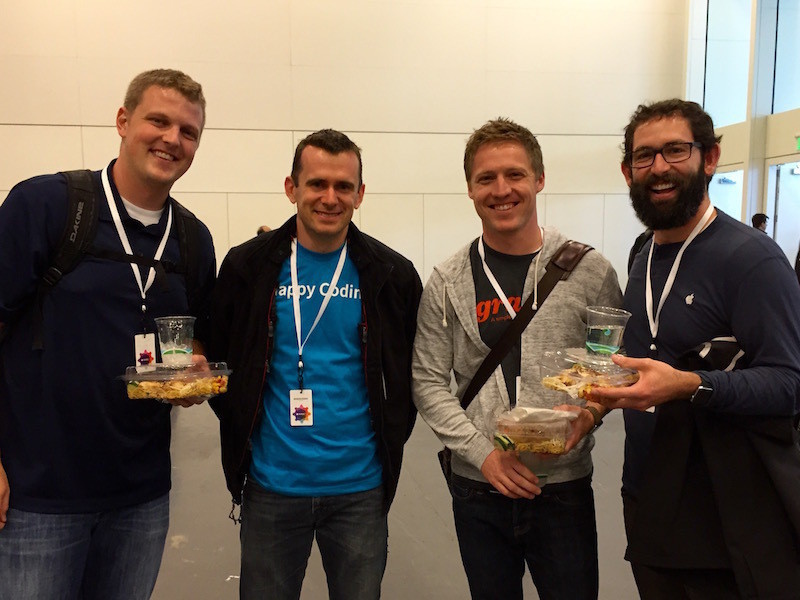
We were pleasantly surprised to find that nearly all of the content was exceptionally helpful and relevant for us. From the beginning of the conference, we knew that it was going to be a different experience. Jess D’Amico greeted us as we came in, and exclaimed, “Are you the group from O.C. Tanner?” We found a very warm welcome in this community and enjoyed ourselves tremendously.

The conference was extremely impactful to me on a personal level. On the first day, we participated in the business workshop, which consisted mainly of introductions and breakout sessions. The conversation of which I was part focused on discovering what is next in our careers. It was deeply personal and refreshingly open and honest. As we talked, someone asked if this was my first Peers. When I confirmed, he told me that this kind of conversation is the essence of Peers, and if I want to, I will find many more similar discussions throughout my time at the conference.

As I flew home, I took some time to write in my journal, and finally came to understand some of the things that I heard on that first day. A career is made up of so many moving pieces, and it can be a real challenge to line them all up properly. I still have a lot to think through and process as a result of Peers, but I am so grateful for the emotions and thoughts it stirred up. This is a kind and generous community that pushed and provoked me to think outside of my previous mental ruts, and I look forward to learning from and participating in it in the years to come.


🌀 Thoughts on Peers 2018

I am lucky enough at work to be able to choose a conference every year to attend for professional development. This year, the five of us iOS developers decided we wanted to find a conference that would give us a slightly different perspective than we usually get, and one that we could all attend together. After hearing Peers mentioned both on Core Intuition and Release Notes, a couple of the only tech podcasts to survive my latest purge, I proposed that we all head to Austin.

To be honest, we did not expect the content to be completely relevant for us. We recognized that Peers is primarily a web and business conference, and we all work as iOS developers at a large enterprise company. But since we are all involved with our company’s efforts to expand our business and start new ventures, we want to keep in touch with the startup and independent developer culture and try to embody some of that inside of our company.

We were pleasantly surprised to find that nearly all of the content was exceptionally helpful and relevant for us. From the beginning of the conference, we knew that it was going to be a different experience. Jess D’Amico greeted us as we came in, and exclaimed, “Are you the group from O.C. Tanner?” We found a very warm welcome in this community and enjoyed ourselves tremendously.

The conference was extremely impactful to me on a personal level. On the first day, we participated in the business workshop, which consisted mainly of introductions and breakout sessions. The conversation of which I was part focused on discovering what is next in our careers. It was deeply personal and refreshingly open and honest. As we talked, someone asked if this was my first Peers. When I confirmed, he told me that this kind of conversation is the essence of Peers, and if I want to, I will find many more similar discussions throughout my time at the conference.

As I flew home, I took some time to write in my journal, and finally came to understand some of the things that I heard on that first day. A career is made up of so many moving pieces, and it can be a real challenge to line them all up properly. I still have a lot to think through and process as a result of Peers, but I am so grateful for the emotions and thoughts it stirred up. This is a kind and generous community that pushed and provoked me to think outside of my previous mental ruts, and I look forward to learning from and participating in it in the years to come.


Moving my blog to bsn.design

My blog at bsn.io has been a great experience. I set it up a few years ago to be a Jekyll blog and hosted it on GitHub Pages. I loved the flexibility this gave me, along with the performance of a static site. Over time, I figured out how to run it almost all from my iOS devices.

One of the downsides of this setup was the temptation to tinker. Because it was all in my control, I spent many hours tweaking things to get it just how I want on that particular day. Being a bit of a designer and developer, I have the curse of perma-tweaking that I have to resist. I finally decided that my time and energy were better directed elsewhere.

I have instead gone all in on Micro.blog. I have long posted my content there, and have published microposts on my blog. Manton Reece has done a phenomenal job at building up the community and infrastructure of Micro.blog so that it is both a blog hosting platform as well as a social network, and I am now going to use both.

My new sites:

Micro.blog handles:

My content will be cross-posted to Twitter with matching usernames, so if people prefer to find or engage with content there, I will continue to have a presence. But moving forward, I will be posting everything to one of my own sites first. Each of my sites has a JSON/RSS feed where you can subscribe if you want. Hopefully this makes it easy for people to choose the content that interests them most and follow or engage it with it easily.

The vision of Micro.blog resonates strongly with me, and I am excited to fully participate in that community. Here’s to many more great years of sharing knowledge and creating meaningful interactions!


Automating Scripture Quotes

Part of being a Mormon is regularly speaking or teaching in church. The official Gospel Library app makes it really simple to find resources to use in those talks and lessons. I like to have all of my content in markdown, which makes creating and referencing the content easy. But getting the quotes into markdown is not always easy. This morning, I created a few Workflow recipes to simplify the process.

The first workflow allows you to select any text in the Gospel Library app and extracts the web link and converts it. The link start as something like this:

[www.lds.org/scripture...](https://www.lds.org/scriptures/dc-testament/dc/130?lang=eng)

The workflow converts the link from a web link to a link that will open the Gospel Library app directly to the content. The converted link looks like this:

gospellibrary://content/scriptures/dc-testament/dc/130?lang=eng

Download convert link workflow

The second workflow builds on the first in some important ways. One of the most important pieces is grabbing the title and creating a formatted markdown link.

The other important piece is grabbing the verses and inserting them in the link if needed. As you might notice above, a link from Gospel Library will be to the chapter of scripture, but not the verses. One note here: if you are grabbing a link to content that does not have chapter and verses, the link will not be changed.

The markdown link looks like this:

[Doctrine and Covenants 130:18-19](gospellibrary://content/scriptures/dc-testament/dc/130.18-19?lang=eng)

Download markdown link workflow

Extracting the entire quote

The final piece is getting out the actual text of the quote. This last workflow uses the previous two in order to capture a formatted markdown quote. The output looks like this:

> 18 Whatever principle of intelligence we attain unto in this life, it will rise with us in the resurrection.
>
> 19 And if a person gains more knowledge and intelligence in this life through his diligence and obedience than another, he will have so much the advantage in the world to come.
>
> [Doctrine and Covenants 130:18-19](gospellibrary://content/scriptures/dc-testament/dc/130.18-19?lang=eng)

Download markdown quote workflow

All three workflows have to be downloaded and installed in order to get the final quote. When they are, it is just one touch to take selected text and get a nicely formatted quote.

18 Whatever principle of intelligence we attain unto in this life, it will rise with us in the resurrection.

19 And if a person gains more knowledge and intelligence in this life through his diligence and obedience than another, he will have so much the advantage in the world to come.

Doctrine and Covenants 130:18-19


Getting started with iOS development

I have been asked frequently how to get started making iPhone apps. Having taught at an iOS development bootcamp for the past few years, I have seen many people approach iOS development and succeed well. Those that excel typically have the right attitude as well as the aptitude.

Part of the challenge is figuring out whether you have those two qualities, and to do so in the most cost- and time-efficient way possible. I almost always suggest the same three steps to people considering this, and thought it would be nice to write them down.

tl;dr

  1. Learn the basics
  2. Sample project
  3. Build an app

1. Exploring the basics

The first step depends on your familiarity with programming in general. Many people have heard of this “coding” thing, and want to get in on it, but all they know is that apps are cool. That is a great place to start, but it is very different from a developer who is looking to learn iOS development in addition to their other skills.

Learning programming concepts

For those with no programming experience, I suggest some free exercises to learn some of the fundamentals. One of the best sources for those is an iPad app created by Apple: Swift Playgrounds app. This will walk you through a number of puzzles and challenges to teach you the basics. This has the added bonus of teaching them using the Swift programming language, which is what you will be using to actually code apps.

This is a great chance to evaluate whether your attitude is the right fit. With the basic concepts, you are not going to know for a little while whether you have the best aptitude, but you can get a feel for whether you enjoy programming in general. As you learn, you will find that programming is often frustrating for long periods of time, followed by a rush as you solve the problem. You need to discover as quickly as possible whether that is a process that you enjoy.

Understanding the Swift language

For developers looking to pick up iOS development, the Swift playgrounds app could still be helpful, but may feel overly basic and simplistic. Instead, Apple has created the Swift language tour that will help bring you up to speed on how to use Swift. The tour has additional links to more details about Swift to help those who prefer to go deep in learning the language.

2. Building a sample project

Once you have a solid handle on the basics of programming and Swift, the next step is to build something. Again, Apple has created a great sample project to walk you through all of the details required. This is a great resource because you can start with the end in mind, and have help all along the way to make that vision a reality.

By the time you have actually created an app, even though it is a simple guided project, you will have a much better idea of your attitude and aptitude fit. If the experience is starting to feel addictive, and you are anxious to create something that you want to have, that is a good sign. If you have been forcing yourself to push on just to finish what you started, you need to evaluate whether you want to continue to invest hundreds of hours in learning and continuing with iOS development. If you are learning programming for the first time, it is natural to need to reference documentation and other resources as you build your first project. Just because the solution does not come immediately to you does not mean that you lack the necessary aptitude. But if you finish the project, and still struggle understanding some of the basic principles, you need to do some honest introspection and decide if this is right for you.

3. Creating your first app

The most important step is to try to create something that solves a problem that matters to you. This will stretch your ability to apply what you have learned. Up to this point, you have been focused on the “what” and “how” of iOS development. You need to advance to understanding the “when” and “why” of the different principles you have learned. When you tackle your own project, you have to determine at each step what you are trying to do, and evaluate the many options you have to solve the issue and choose the best fit and then implement it.

As you start to branch out beyond guided practice, you are going to need to rely on many resources. Obviously, searching the internet for what you are trying to do is going to be the first choice for many people. The risk in doing that is getting incomplete or incorrect information. When searching for resources, I suggest prioritizing the following resources above all others.

Apple Developer marketing-y pages

Apple has done a lot of work in creating a starting point to help developers approach different topics. Whenever possible, you want to start with a marketing-type page from the Apple developer site. A great example is the Apple iOS Developer page for getting started in general. Most of these pages are included in the Resources list of the main Develop page of the Apple Developer site. These pages are extremely helpful because they include an overview of the topic, along with curated lists of resources to dive deeper.

Programming Guides

If there is not a developer landing page, or if you are ready to go deeper on a topic, you should look for a programming guide. These include detailed explanations along with sample code to help you understand a topic thoroughly. They can range from broad topics such as App Programming Guide for iOS to more specifics such as the View Controller Programming Guide.

Source code documentation

Finally, you should look to the actual documentation Apple creates for the APIs you want to use. These can be found either online, or through Xcode. An example is the UIViewController documentation. As you become more advanced, you will find yourself referencing this kind of documentation more and more without needing the additional explanations that come in the developer pages or programming guides. The existence of these pages is one of the main reasons that I prefer iOS development to web development. If you ever have a question about how something works, or what is possible, you can go look at the source documentation. This becomes your “Bible” and is always available for reference.

Where to go from here

When you have made it this far, you have a decision to make. If you want iOS development to be a hobby or something you do on the side because it is fun, you can just keep trying to build more projects. If you become more serious about improving your skills and abilities, you will want to look for more advanced resources.

Apple has produced a series of books designed for education that can also be used for those looking to teaching themselves. Start with Intro to App Development with Swift is that is what you want.

Another resource to consider is getting further education, such as a coding bootcamp or a college degree. Obtaining a degree in higher education is a great way to master the theory behind programming and can be a great stepping stone to future opportunities. A coding bootcamp is a much faster path to determine your attitude and aptitude fit, and to be able to start shipping apps. Often, this level of education is sufficient to start contributing as a junior developer, and you will learn even more of what is needed to succeed on the job. However, many people that finish a coding bootcamp still need to continue to invest serious time in creating apps and gaining experience before they are ready to be employed.

Hopefully this has been useful if you are considering getting started with iOS development. It is a magical opportunity of pure creation. I hope you will join me on this exciting journey.


Updating layouts for iPhone X

Apple generally provides us as developers plenty of notice to make updates, whether explicit or implied. There are a number of these that I have been doing slowly this year for various reasons—High Sierra, Swift 4, iPhone X layout. Starting at WWDC, we could have been updating our apps to be prepared for the iPhone X layout changes, although none of us knew exactly what to expect. All we knew was that “safe area layout guides” were a thing and we should be using them.

Since receiving my own iPhone X, I have been much more motivated to get my own apps updated to work better with the unique layout challenges. I wanted to capture some of the standard changes I find myself making repeatedly.

Note: I make heavy use of storyboards, so most of my explanations will involve Interface Builder.

Enable safe area layout guides

The first crucial step is to enable safe area layout guides in the storyboard. When updating from Xcode 8 to Xcode 9, this setting will be off by default, while any new storyboards created in Xcode 9 will have it enabled by default. Simply open the file inspector (the first inspector in the right pane in Xcode), and check the box named “Use Safe Area Layout Guides” to enable them.

Enable safe area layout guides

Table views

Through the content view in UITableViewCell, table views work almost magically with the iPhone X. One of the main changes I have found is that the table view itself needs to be constrained to the actual view of the view controller, and not the safe area. If you had the table view constrained to the edges in Xcode 8, when you enable the safe area layout guides, those constraints will be converted to be relative to the safe area. For a table view, you don’t want that. You need to go in and modify each constraint to be relative to the superview instead.

Constrain to superview

Custom separators

Many of my custom table view cells will have a custom separator line. This is common if different cells in the same table need to have different separators. Typically, those views were constrained to the content view of the cell. However, that will leave the separators inset when in landscape mode because of the safe area layout guides. Instead, constrain the views to the cell itself. The exception to this rule is for separators that should be inset, typically on the leading edge. In that case, the leading edge of the view should remain constrained to the content view of the cell in order to retain the proper inset.

Constrain to cell

Extra bottom view

Many designs have a view at the bottom of the screen. This view would typically be constrained to the bottom layout guide previously, and that constraint would be converted to be relative to the safe area. This will leave an unsightly gap at the bottom of the screen.

Gap at bottom Bottom view constrained to safe area

There are two solutions I have used to correct this situation. The first is to simply add an extra UIView with a matching background color below the original view. That view will be constrained to the leading and trailing of the original view, and the bottom will be constrained to the superview—not the safe area. Then with a vertical spacing constraint between the views, you are set. When on a device where the safe area is the bottom of the device, the extra view will have a height of 0. On the iPhone X, the extra view will go from the bottom of the screen up to the bottom of the safe area.

The other solution is very similar, but instead of placing the view below your original view, it is embedded inside of it with a clear background color. Then you change the constraints of the original view to be to the superview and not the safe area. Then any views you have inside of your original view will have their bottom relative to this new spacer view. This is definitely the preferred solution if your original view is a visual effect view.

Extra bottom view

Summary

There are many more adjustments to consider when updating an app for the iPhone X, but these are the most common situations I have encountered. I look forward to having my apps feel at home on this new device.


Simpler blogging with Working Copy

I have written before about my attempts to publish to my GitHub Pages blog from iOS. I have recently started using Working Copy to make this even easier. Basically, I am trying to remove all of my excuses in the hopes that I will be more diligent in posting to my blog.

There are three pieces to my new process that I want to explore:

  1. Microblog posts
  2. New drafts
  3. Publishing

Microblog posts

Since September 2016, I have been publishing microblog posts to my own site in addition to sharing them on Twitter or Instagram, and more recently on Micro.blog. This has come as a direct result of listening to Manton Reece and agreeing with his thoughts on owning your content. I want to continue the simplicity of being able to post a thought quickly, particularly with an image since I am often sharing my sketchnotes.

Prior to using Working Copy, my process involved Workflow recipes that made use of the GitHub API to post the content to my site repository. Essentially, I still use the same process in terms of taking the text or images and publishing them to my site. But my new Workflow recipe is considerably simpler, and leverages Working Copy and X-Callback-URLs to simplify the process.

New drafts

My favorite writing app, iA Writer, gives me great flexibility in writing my posts. I have gone back and forth on storing my drafts just in iA Writer using iCloud, or having them live in my site repository. Thanks to iA Writer’s feature of opening directly a file from another app, and Working Copy serving as a document provider, I can create a draft in Working Copy and edit it in iA Writer. As of now, my current process is to create a draft in iA Writer using this Workflow. When I feel like it is ready, I will publish it as a draft to my site using this Workflow. That gives me the chance to see it in context on my site, together with all images and links and make sure that everything looks good and works properly.

Publishing

The final step is taking my post from draft status to published. As I mentioned, at this point the post is live on my site in the Drafts section, so I can proofread and check everything. I do my editing either in Working Copy or iA Writer, committing the changes back to GitHub. When I am finally ready to pull the trigger, this Workflow essentially moves the file from the Drafts folder to the Posts folder, and edits the file name a bit to make it an official post on my blog. The Workflow takes me to my site at the end so I can see the post one last time in all its published glory.

Summary

Using Working Copy on my iPad / iPhone means that I always have the entire source code of my site with me. It has made life so much easier when I want to edit or tweak the site. Since I prefer to write in Markdown, and to do everything on an iOS device, this has been the ideal setup for me. Simple integrations with Workflow keep process frictionless. Hopefully this is enough to help ensure that I post more often to my blog.

Just for reference, here are all of the Workflow recipes I am currently using for this process:


Riding the wave

I think that all humans are phasic to some degree or other. As a strange mix of emotion and logic, there are natural tensions that operate on us. We are wired to notice the new or unusual, and this has a real impact on our ability to focus on a task or project for an extended length of time. I have found that to be extremely true in myself. I will get excited about a new project and dive in with great passion. But after the novelty wears off, and I am distracted by something new, it is far too easy to let go of previous projects.

This has certainly been true with my blogging. I will go in phases where I am diligent about writing, and find it extremely beneficial. But, inevitably, new things come up. For me, those typically come in the form of new apps that I want to build. It is a real challenge to maintain consistency with a naturally long-term task like blogging.

At different times in my life, I have tried to fight this tendency with varying levels of success. There are certainly long-term commitments that need to not fade from priority or lose attention. Some of the most important for me are my wife and six kids. But not all projects needs to have that same level of persistence.

Lately, I have been thinking more about embracing the fact that my interests drift. Obviously there needs to be a balance so that crucial part of life are not abandoned. But it is really not a problem if I start on a project, and then move on to another one before finishing the first. Too often, I will stick with a project just because it was the plan, and not because it is still the priority. I want to get better at being flexible and adapting, and my personality pulls at me to do that already.

Moving forward, my philosophy will be to ride the wave a bit more. There is a natural ebb and flow to life, and it is ok to give myself permission to follow that. I need to occasionally take stock and make sure that my true priorities are not being neglected. But in my hobbies and side projects, I am allowing myself to dive in when I am passionate and back off when I am not. I will check back in after a few months and see what adjustments need to be made.


Public drafts with a GitHub Pages blog

I wrote last week about publishing to a GitHub Pages blog using Workflow on the iPad. As I worked on writing that post, I realized there was one piece missing from my process: previewing the draft. When I write locally on my computer, I compile the site using Jekyll commands and include drafts. Then I can work on a post and make sure that the links all work properly and do a final check before publishing the post. With the Workflow process I created, a post would go straight from iA Writer to being published on my site, and that made me a bit nervous.

Displaying drafts

Jekyll already supports drafts, but the only way to see them is when building locally. As I looked into the easiest way to display drafts on my published site, I realized that I already have a model that would work well. For my apps and libraries, I am using the collections feature of Jekyll. In order to extend the default functionality of drafts to make them public, only a few small changes are needed:

  1. Add drafts collection
  2. Specify default layout
  3. Make an index page
  4. Prevent indexing

1. Add drafts collection

In your _config.yml file, add a few lines to enable the drafts collection:

2. Specify default layout

Also in _config.yml, it is easiest to provide a default layout for all drafts. This way, you can omit the layout from the front matter of the actual post, and it will display correctly when it is a draft, as well as when you publish the post.

3. Make an index page

At this point, the individual drafts will display correctly, but it is much easier to have a list page to access them. It can be as simple as this:

4. Prevent indexing

You may have noticed an entry in the front matter of the drafts index page with the key meta_robots. I have something similar in the draft.html default layout:

These insert the correct metadata in the head using the following code:

This ensures that the drafts can be posted without impacting the site or having incorrect links show up in search results. It is still possible for someone to find one of these posts and link to it, which will result in a 404 after publishing, but the likelihood of that is low enough to not be a real concern.

Add workflows

All of this work is nice, but without some additions and updates to the workflows I posted previously, this would still require publishing from a computer. As I looked into support for publishing drafts using Workflow, the one piece missing was the ability to send a DELETE message to the GitHub API. I asked Workflow support if there was any way to do this and got a fantastic response with a workaround.

Armed with this workaround, I was able to create a few additional workflows:

Improved post publishing

Finally, I wanted to handle the draft well when publishing the blog post. The workflow to publish a post will hit GitHub first to see if a draft is there with the same name, and if so, the draft will be deleted and the post will be published with the correct date. This completes the draft process, allowing you to start by publishing a draft, update it one or more times for review, and then actually publishing the post.

Previous workflows

Just for reference, here are the previous workflows that have all been updated:


Using Workflow to publish to GitHub Pages

Update: I published a follow-up post about incorporating drafts into the process.

Microblog posts

This blog is hosted using GitHub Pages, which has worked out extremely well for me. However, there can sometimes be too much friction to get content published, especially short-form microblog posts. Recently, I was talking with Manton Reece about how to publish Instagram posts to my microblog. He mentioned that he uses Workflow, a fantastic automation app for iOS, to take an Instagram photo and publish it to his WordPress blog. He wrote a post about his process that was helpful as I looked at how to make this work for my needs. Another big help was a recent series about Workflow on Canvas, a podcast about iPhone and iPad productivity.

I only recently started posting my professional content to Instagram, such as sketchnotes and drawings, and it feels like a great fit. I want to keep sharing there, but I want to make sure that I have my own record of the content I am posting as well. Using the workflow I created, here are the basic steps:

  • While posting to Instagram, copy the caption text to the clipboard. This will be the default text for the microblog post, although I can edit it if I want.
  • Select the image in Photos, or run the workflow and select the image later.
  • Workflow creates a title for both the image and the post based on the date.
  • Confirm the post text that Workflow creates, complete with the proper front matter for posting to GitHub.
  • Workflow commits the image and, if that is successful, the text post to my blog repository using the GitHub API.
  • Optionally compose a tweet with the image and text of the post.

I am pretty excited about how simple it is. I have made the workflow so that it can be launched from some text, an image, or even directly in Workflow and select the image and write the text later. This has helped reduce the friction and encourages me to post more frequently. You can still follow me on Instagram, but all of my posts will also be available on my microblog.

Full blog posts

After getting publishing working for microblog posts, I had to keep going. I have started most of my posts on the iPad using iA Writer, and up until now, I would sync them over to my computer to publish them to GitHub. I decided to make a few more workflows so that I could do all of my publishing from my iPad, or even my iPhone. They all work similarly to the workflow for microblog posts. Here are links to download the workflows:

The update workflows will take in an existing file, find it on GitHub, and commit an update to the file. Adding the workflows for photos and files allows me to publish everything that the blog post will need. These have the side benefit of being able to upload any files to a repository, so their use is not limited to GitHub Pages blogs.

Going meta

One of my favorite parts of writing this post describing my new process is using that process. I even added a step to publish and update drafts on my site so that I can preview them and make sure all of the links are working properly before publishing. So I have written this post in iA Writer, published a draft and a few updates to my blog using Workflow, and am now publishing and sharing the actual post using Workflow. 💥

Onward

Part of my reason for posting this is to motivate my future self to be more consistent with posting. I have removed all of my excuses, and look forward to writing more regularly. Hopefully this has been helpful to you as well. If you have any thoughts or questions, feel free to reach out on Twitter.


Takeaways from Release Notes

Indianapolis

Old Union Station in Indianapolis

This week, I attended Release Notes, and it was great. I sketchnoted the talks, and posted a summary with all of them. Before I came to the conference, my wife asked what I was hoping to get out of it, and my first answer was to meet new people. She was a little surprised by that, and reminded me that networking is not something that I typically enjoy or do particularly well. So I set a goal to talk with at least one person each day for an extended time and get to know them better.

Accomplishing that goal was easier than I had thought, although it still required me to push myself outside of my comfort zone. The conference was organized intentionally for a group of introverted developers who want to meet other people, but are not skilled at that. We had plenty of time between talks to have conversations, and long breaks for lunch and before dinner. It was perfect for me. The other big thing that helped was my sketchnotes. After the first couple talks, people began to notice the sketchnotes, and it was an easy jumping off point to begin conversations with people. It is so much easier when people come up to talk to you instead of the inverse.

Action items

I want to force myself to turn my thoughts into action as I leave the conference. I found myself talking about Pointedly every time that I introduced myself, and realized that it is my true passion project right now, and I should do more with it.

  • Designate different locations and positions for different kinds of work
  • Have a lawyer review my LLC
  • Get liability insurance
  • Form a daily writing habit
  • Set writing goals for my blog and journal
  • Experiment with pricing in my apps
  • Prepare Pointedly for a subscription model
  • Answer all outstanding support requests
  • Schedule daily time for support
  • Answer incoming support within a day
  • Say exactly what I mean, without trying to make someone feel a certain way
  • Plan a solid demo for each app I want to show off and practice it
  • Find an official personal board of directors

Many of these actions items come down to discipline for me. I need to be better at time management and making sure that I am focusing on my most important tasks. My adherence to a planning and execution system has fluctuated wildly, but I know that I am most effective when I am consistent and methodical.

Sketchnotes

One unexpected outcome of this conference was a rekindling of my passion for sketchnoting. I have done some occasional sketchnotes over the past couple of years, but since I started focusing on iOS development, I have done little else. One thing that I want to let simmer in the back of my mind is an app to help with sketchnoting. I have no idea what shape that will take yet, but it would be a perfect marriage of my two biggest professional passions. In the meantime, I want to make sure that this is a skill that I continue to hone and exercise regularly. Creating sketchnotes is incredibly rewarding personally, but the best part is the connections that it forms with others. People are drawn to them, and it makes for great conversations that could not happen otherwise. Like most things, I need to carve out time to practice so that I can progress and avoid regressing.

I am so grateful that I had the opportunity to attend Release Notes this year. I look forward to working to implement these ideas and to continue to learn from others and nurture the relationships that I formed.


Adding automation to open-source projects

One goal that I have had for all of my open-source projects is to have run automated builds and have complete test coverage. Achieving this goals is a slow process, but something that I have wanted to learn and get more comfortable with so that I can be more disciplined. I decide to post the build status and coverage data for all of my libraries on my site, to provide myself additional incentive to hurry and get everything updated.

At my day job, we are using Jenkins and Fastlane to run all unit and UI tests after every commit that is pushed, and to submit to iTunes Connect after every merge to master following a successful pull request. For my open-source libraries, I just wanted something to make sure that they build and run all the tests after changes. For now, I landed on using Travis to run the automated builds, and Codecov to collect coverage reports. I wanted to capture some of the process to be able to refer back to it, and hopefully it can help others with similar goals.

Steps

All examples are using my TextMagic framework. Remember to change the names to match your project.

  1. Set up Travis to start building your project
  2. Add travis.yml to project (see sample below)
  • Make sure to build either project or workspace, as needed
  1. Add slather.yml to to limit coverate reporting to Sources using Slather (see sample below)
  2. Include a call to Codecov after the build in Travis to collect code coverage information (see sample below)
  3. Test locally to make sure that it builds properly and then view the reports on Codecov
  • xcodebuild -workspace TextMagic.xcworkspace -scheme TextMagic -sdk iphonesimulator9.3 -destination="OS=9.3,name=iPhone 6S Plus" -configuration Debug GCC_INSTRUMENT_PROGRAM_FLOW_ARCS=YES GCC_GENERATE_TEST_COVERAGE_FILES=YES ONLY_ACTIVE_ARCH=YES test | xcpretty -c
  • slather coverage -s --scheme TextMagic --workspace TextMagic.xcworkspace/ TextMagic.xcodeproj/
  1. Push to GitHub, and make sure Travis builds successfully
  2. Include build and coverage information in your README.md file

<div class=“badges”> <a href=“https://travis-ci.org/benjaminsnorris/TextMagic"&gt;&lt;img src=“https://img.shields.io/travis/benjaminsnorris/TextMagic.svg" alt=“Build Status”></a> <br/> <code class=“highlighter-rouge”> Build Status </code> <br/> <br/> <a href=“https://codecov.io/gh/benjaminsnorris/TextMagic"&gt;&lt;img src=“https://img.shields.io/codecov/c/github/benjaminsnorris/TextMagic.svg" alt=“Code Coverage”></a> <br/> <code class=“highlighter-rouge”> codecov </code> </div>

Sample travis.yml file

language: objective-c

before_install:
  - gem install xcpretty --no-rdoc --no-ri --no-document --quiet
  - gem install slather

env:
  global:
    - LC_CTYPE=en_US.UTF-8
    - LANG=en_US.UTF-8
    - PROJECT_NAME="TextMagic"
    - WORKSPACE_SUFFFIX=".xcworkspace"
    - FRAMEWORK_SCHEME="TextMagic"
    - IOS_SDK=iphonesimulator9.3

matrix:
  include:
    - osx_image: xcode7.3
      env: DESTINATION="OS=9.0,name=iPhone 6S Plus"  SCHEME="$FRAMEWORK_SCHEME" SDK="$IOS_SDK"
    - osx_image: xcode7.3
      env: DESTINATION="OS=9.1,name=iPhone 6S"       SCHEME="$FRAMEWORK_SCHEME" SDK="$IOS_SDK"
    - osx_image: xcode7.3
      env: DESTINATION="OS=9.3,name=iPad Pro"        SCHEME="$FRAMEWORK_SCHEME" SDK="$IOS_SDK"

script:
  - set -o pipefail
  - xcodebuild -version
  - xcodebuild -showsdks
  - xcodebuild
    -workspace "$PROJECT_NAME$WORKSPACE_SUFFFIX"
    -scheme "$SCHEME"
    -sdk "$SDK"
    -destination "$DESTINATION"
    -configuration Debug
    GCC_INSTRUMENT_PROGRAM_FLOW_ARCS=YES
    GCC_GENERATE_TEST_COVERAGE_FILES=YES
    ONLY_ACTIVE_ARCH=YES
    test
    | xcpretty -c

after_success:
  - slather
  - bash &lt;(curl -s [codecov.io/bash](https://codecov.io/bash)) -J "$PROJECT_NAME" -f ./test_reports/cobertura.xml

Sample slather.yml file

# .slather.yml

coverage_service:   cobertura_xml
xcodeproj:          TextMagic.xcodeproj
workspace:          TextMagic.xcworkspace
scheme:             TextMagic
source_directory:   Sources
output_directory:   test_reports

Sample call to Codecov

bash &lt;(curl -s [codecov.io/bash](https://codecov.io/bash)) -J "$PROJECT_NAME" -f ./test_reports/cobertura.xml

Even though this call is included already in the sample travis.yml file, I want to explain it a bit more.

bash &lt;(curl -s [codecov.io/bash](https://codecov.io/bash)) downloads the latest script from Codecov.

-J "$PROJECT_NAME" specifies the packages to build coverage. This can significantly reduces time to build coverage reports.

-f ./test_reports/cobertura.xml targets the file that Slather created so that it is not searching for all reports.


🧪 The value of iOS test-driven development (TDD)

This will not come as a surprise to most people—writing tests makes your code better. I have come to appreciate this more over the past few months, as I wrote about previously. Also not a surprise—writing tests first makes your code even better. From my experience with iOS developers, while we might know this, most of us do not do it. Even after coming to see the value, it is easy to skip straight to writing the code. I had an experience this week that highlighted the value of this for me again, and wanted to pause and reflect before allowing myself to lose the lesson.

The story

I wrote earlier this week about handling live text reload elegantly, and wanted to share a bit more about the process I went though. It went something like this:

  1. 💡 Think of a great idea to add to the app
  2. 🖥 Write the code to update text and preserve cursor position
  3. ⌨️ Write tests to verify my code worked properly
  4. 🎊 Bask in the illusion of completion
  5. 🙄 Step away from the project and realize I should probably support text selection as well
  6. ⌨️ Write failing tests for all the scenarios I could think of
  7. 🖥 Implement the logic for text selection
  8. 😒 Run the tests and realize I had broken cursor position support
  9. 😅 Repeat previous two steps until everything passed
  10. 🎉 Write an exultant blog post

The realization

After I was done, it hit me how different it was to write the code before the tests instead of vice versa. When the code came first, my tests just verified my code. I had come up with all the scenarios I thought I needed to support, and had coded them, so I just made sure that they worked as I intended.

However, when I wrote the tests first, it was a completely different mental exercise. I was not worried about how I was going to implement the different scenarios—I was just focused on thinking of all possible scenarios. Not only did I think of many different cases for text selection, but I realized that I had omitted a number of cases for cursor position as well.

The takeaway

My adherence to TDD has ebbed and flowed over time. It is easy to want to jump straight into writing the code and seeing something work in the simulator. But taking the time at the beginning to consider the desired behavior, and writing tests for that behavior makes for better code and fewer rewrites and regressions.

Sometimes, it can feel impossible to start with tests. Your tests will not compile if the objects they are testing do not exist yet. One approach that has worked well for me is to start by writing descriptive function names for tests, and then moving on to writing the rest of everything. The process looks something like this:

  1. Create a test case class and write empty test functions
  2. Create objects with properties and stubbed functions
  3. Fill in failing tests to verify behavior
  4. Implement the functions and logic needed for the tests to pass
  5. Adjust tests and code as needed

One of the most exciting aspects to programming is how much you learn while you are working through something. Invariably, you will have to make changes to the tests as you think through the implementation details. The trick is to make sure that your tests remain focused on the behavior, and not the actual implementation details. That way, if you refactor the implementation, your tests can still verify that the behavior remains intact.

The conclusion

A major benefit to using this approach is that it helps you write more reusable code, which has been a focus of mine lately. You still need to learn about good design patterns and best practices. But starting with your tests means that you are exercising the API from the beginning, and that will help you think through having a good API as you build it.

Part of my purpose in writing this post is to help myself recommit to TDD in all of my projects. It is too easy to get lazy and skip the tests altogether. That is part of why I have put build, coverage and version badges on all of my open-source project pages on this site. I am hoping that the shame of not having tests and builds and coverage will help motivate me to get this done quickly. My future self will thank me later.


Handling live text reload elegantly

In my current project at my day job, we are using Firebase and ReSwift. I plan to write more about this powerful combination soon. One of the major advantages is that it allows us to easily support live reloading of concurrent editing. However, I ran into a problem in long-form text editing. It was impressive to see the text update while someone else edited the same data, but if you were also trying to type, it would get extremely frustrating. With every reload, your cursor would jump to the end of the text, making it nearly impossible to keep working.

One of my favorite podcasts, Runtime, recently mentioned approaches to diffing text. I reached out to Sam Soffes, who pointed me to a simple library he created for this, diff.

Using that library, I was ready to tackle preserving the cursor position and text selection when the underlying text changed. In the hopes that others can benefit from or improve this work, here is the code that I am using:

func updateText(with newString: String?) {
    guard let textView = textView, newString = newString,
      (diffRange, changedText) = diff(textView.text, newString) else { return }
    guard let selectedRange = textView.selectedTextRange else { textView.text = newString; return }
    textView.text = newString

    let cursorOffset = textView.offsetFromPosition(textView.beginningOfDocument, toPosition: selectedRange.start)
    let selectedEndOffset = textView.offsetFromPosition(textView.beginningOfDocument, toPosition: selectedRange.end)
    let selectedRangeLength = selectedEndOffset - cursorOffset

    if selectedEndOffset &lt; diffRange.startIndex {
        // Change is after current cursor
        moveCursorRelativeToBeginning(with: cursorOffset, rangeLength: selectedRangeLength)
    } else if cursorOffset &lt; diffRange.startIndex &amp;&amp; selectedEndOffset &gt; diffRange.endIndex {
        // Change occurs within selection
        moveCursorRelativeToBeginning(with: cursorOffset, rangeLength: selectedRangeLength + changedText.characters.count - diffRange.count)
    } else if cursorOffset &gt;= diffRange.endIndex {
        // Change occurs completely before current cursor
        moveCursorRelativeToBeginning(with: cursorOffset + changedText.characters.count - diffRange.count, rangeLength: selectedRangeLength)
    } else if diffRange.startIndex &lt; selectedEndOffset &amp;&amp; diffRange.startIndex &gt; cursorOffset {
        // Change starts in middle of selection
        moveCursorRelativeToBeginning(with: cursorOffset, rangeLength: selectedRangeLength - (selectedEndOffset - diffRange.startIndex))
    } else if diffRange.startIndex &lt;= cursorOffset &amp;&amp; cursorOffset &lt; diffRange.endIndex {
        // Change is a removal/change over the current cursor position
        let rangeLength = selectedRangeLength - (diffRange.endIndex - cursorOffset)
        moveCursorRelativeToBeginning(with: cursorOffset - (cursorOffset - diffRange.startIndex) + changedText.characters.count, rangeLength: rangeLength &gt; 0 ? rangeLength : 0)
    }
}

private func moveCursorRelativeToBeginning(with offset: Int, rangeLength: Int = 0) {
    guard let textView = textView, startPosition = textView.positionFromPosition(textView.beginningOfDocument, offset: offset), endPosition = textView.positionFromPosition(startPosition, offset: rangeLength) else { return }
    textView.selectedTextRange = textView.textRangeFromPosition(startPosition, toPosition: endPosition)
}

This is even more useful when combined with the automated tests that ensure that it is working properly. Here are all of the tests:

import XCTest
import Nimble
import Diff
@testable import align

class TextEditingSpec: XCTestCase {

    var textEditing: TextEditing!

    override func setUp() {
        super.setUp()
        textEditing = TextEditing.initializeFromStoryboard()
        let _ = textEditing.view
        textEditing.textView = UITextView()
    }

    /// test that it loads properly
    func testThatItLoadsProperly() {
        expect(self.textEditing.textView).toNot(beNil())
        expect(self.textEditing.textView?.text) == ""
        expect(self.textEditing.title).to(beNil())
    }


    // MARK: - Cursor position tests

    // Original text: "Watch Bugger attack videos together and discuss strategy."

    /// test that cursor position does not change if state changes but agenda is unchanged
    func testThatCursorPositionDoesNotChangeIfStateChangesButAgendaIsUnchanged() {
        textEditing.textView?.text = "Watch Bugger attack videos together and discuss strategy."
        textEditing.textView?.becomeFirstResponder()
        moveCursorRelativeToBeginning(with: 10)
        expect(self.cursorOffset()) == 10
        expect(self.selectedRangeLength()) == 0

        textEditing.updateText(with: "Watch Bugger attack videos together and discuss strategy.")
        expect(self.cursorOffset()) == 10
        expect(self.selectedRangeLength()) == 0
}

    /// test that cursor position does not change when agenda has changes after cursor
    func testThatCursorPositionDoesNotChangeWhenAgendaHasChangesAfterCursor() {
        textEditing.textView?.text = "Watch Bugger attack videos together and discuss strategy."
        textEditing.textView?.becomeFirstResponder()
        moveCursorRelativeToBeginning(with: 10)
        expect(self.cursorOffset()) == 10
        expect(self.selectedRangeLength()) == 0

        textEditing.updateText(with: "Watch Bugger attack videos together.")
        expect(self.cursorOffset()) == 10
        expect(self.selectedRangeLength()) == 0
    }

    /// test that cursor position changes when agenda has removed text before current cursor position
    func testThatCursorPositionChangesWhenAgendaHasRemovedTextBeforeCurrentCursorPosition() {
        textEditing.textView?.text = "Watch Bugger attack videos together and discuss strategy."
        textEditing.textView?.becomeFirstResponder()
        moveCursorRelativeToBeginning(with: 10)
        expect(self.cursorOffset()) == 10
        expect(self.selectedRangeLength()) == 0

        textEditing.updateText(with: "Bugger attack videos together and discuss strategy.")
        expect(self.cursorOffset()) == 4
        expect(self.selectedRangeLength()) == 0
    }

    /// test that cursor position changes when agenda has changed text before current cursor position
    func testThatCursorPositionChangesWhenAgendaHasChangedTextBeforeCurrentCursorPosition() {
        textEditing.textView?.text = "Watch Bugger attack videos together and discuss strategy."
        textEditing.textView?.becomeFirstResponder()
        moveCursorRelativeToBeginning(with: 10)
        expect(self.cursorOffset()) == 10
        expect(self.selectedRangeLength()) == 0

        textEditing.updateText(with: "View Bugger attack videos together and discuss strategy.")
        expect(self.cursorOffset()) == 9
        expect(self.selectedRangeLength()) == 0
    }

    /// test that cursor position changes when agenda has removed text that includes current cursor position
    func testThatCursorPositionChangesWhenAgendaHasRemovedTextThatIncludesCurrentCursorPosition() {
        textEditing.textView?.text = "Watch Bugger attack videos together and discuss strategy."
        textEditing.textView?.becomeFirstResponder()
        moveCursorRelativeToBeginning(with: 10)
        expect(self.cursorOffset()) == 10
        expect(self.selectedRangeLength()) == 0

        textEditing.updateText(with: "Watch attack videos together and discuss strategy.")
        expect(self.cursorOffset()) == 6
        expect(self.selectedRangeLength()) == 0
    }

    /// test that cursor position changes when agenda has changed text that includes current cursor position
    func testThatCursorPositionChangesWhenAgendaHasChangedTextThatIncludesCurrentCursorPosition() {
        textEditing.textView?.text = "Watch Bugger attack videos together and discuss strategy."
        textEditing.textView?.becomeFirstResponder()
        moveCursorRelativeToBeginning(with: 10)
        expect(self.cursorOffset()) == 10
        expect(self.selectedRangeLength()) == 0

        textEditing.updateText(with: "View recorded Bugger attack videos together and discuss strategy.")
        expect(self.cursorOffset()) == 18
        expect(self.selectedRangeLength()) == 0
    }


    // MARK: - Selected text tests

    /// test that text selection does not changes when text does not change
    func testThatTextSelectionDoesNotChangesWhenTextDoesNotChange() {
        textEditing.textView?.text = "Watch Bugger attack videos together and discuss strategy."
        textEditing.textView?.becomeFirstResponder()
        moveCursorRelativeToBeginning(with: 6, length: 6)
        expect(self.cursorOffset()) == 6
        expect(self.selectedRangeLength()) == 6

        textEditing.updateText(with: "Watch Bugger attack videos together and discuss strategy.")
        expect(self.cursorOffset()) == 6
        expect(self.selectedRangeLength()) == 6
    }

    /// test that text selection does not change when text changes occur after selection
    func testThatTextSelectionDoesNotChangeWhenTextChangesOccurAfterSelection() {
        textEditing.textView?.text = "Watch Bugger attack videos together and discuss strategy."
        textEditing.textView?.becomeFirstResponder()
        moveCursorRelativeToBeginning(with: 6, length: 6)
        expect(self.cursorOffset()) == 6
        expect(self.selectedRangeLength()) == 6

        textEditing.updateText(with: "Watch Bugger attack videos and discuss strategy.")
        expect(self.cursorOffset()) == 6
        expect(self.selectedRangeLength()) == 6
    }

    /// test that text selection remains same but moves when text is added before selection
    func testThatTextSelectionRemainsSameButMovesWhenTextIsAddedBeforeSelection() {
        textEditing.textView?.text = "Watch Bugger attack videos together and discuss strategy."
        textEditing.textView?.becomeFirstResponder()
        moveCursorRelativeToBeginning(with: 6, length: 6)
        expect(self.cursorOffset()) == 6
        expect(self.selectedRangeLength()) == 6

        textEditing.updateText(with: "Watch the Bugger attack videos together and discuss strategy.")
        expect(self.cursorOffset()) == 10
        expect(self.selectedRangeLength()) == 6
    }

    /// test that text selection adjusts to include changes that occur within the selection
    func testThatTextSelectionAdjustsToIncludeChangesThatOccurWithinTheSelection() {
        textEditing.textView?.text = "Watch Bugger attack videos together and discuss strategy."
        textEditing.textView?.becomeFirstResponder()
        moveCursorRelativeToBeginning(with: 6, length: 6)
        expect(self.cursorOffset()) == 6
        expect(self.selectedRangeLength()) == 6

        textEditing.updateText(with: "Watch Bear attack videos together and discuss strategy.")
        expect(self.cursorOffset()) == 6
        expect(self.selectedRangeLength()) == 4
    }

    /// test that text selection expands to include additions that occur within the selection
    func testThatTextSelectionExpandsToIncludeAdditionsThatOccurWithinTheSelection() {
        textEditing.textView?.text = "Watch Bugger attack videos together and discuss strategy."
        textEditing.textView?.becomeFirstResponder()
        moveCursorRelativeToBeginning(with: 6, length: 6)
        expect(self.cursorOffset()) == 6
        expect(self.selectedRangeLength()) == 6

        textEditing.updateText(with: "Watch Big bad bugger attack videos together and discuss strategy.")
        expect(self.cursorOffset()) == 6
        expect(self.selectedRangeLength()) == 14
    }

    /// test that text selection is truncated when the end of the selection is removed
    func testThatTextSelectionIsTruncatedWhenTheEndOfTheSelectionIsRemoved() {
        textEditing.textView?.text = "Watch Bugger attack videos together and discuss strategy."
        textEditing.textView?.becomeFirstResponder()
        moveCursorRelativeToBeginning(with: 6, length: 6)
        expect(self.cursorOffset()) == 6
        expect(self.selectedRangeLength()) == 6

        textEditing.updateText(with: "Watch Bug attack videos together and discuss strategy.")
        expect(self.cursorOffset()) == 6
        expect(self.selectedRangeLength()) == 3
    }

    /// test that text selection is truncated when the end of the selection is changed
    func testThatTextSelectionIsTruncatedWhenTheEndOfTheSelectionIsChanged() {
        textEditing.textView?.text = "Watch Bugger attack videos together and discuss strategy."
        textEditing.textView?.becomeFirstResponder()
        moveCursorRelativeToBeginning(with: 6, length: 6)
        expect(self.cursorOffset()) == 6
        expect(self.selectedRangeLength()) == 6

        textEditing.updateText(with: "Watch Bug vehicle attack videos together and discuss strategy.")
        expect(self.cursorOffset()) == 6
        expect(self.selectedRangeLength()) == 3
    }

    /// test that text selection is truncated when the beginning of the selection is removed
    func testThatTextSelectionIsTruncatedWhenTheBeginningOfTheSelectionIsRemoved() {
        textEditing.textView?.text = "Watch Bugger attack videos together and discuss strategy."
        textEditing.textView?.becomeFirstResponder()
        moveCursorRelativeToBeginning(with: 6, length: 6)
        expect(self.cursorOffset()) == 6
        expect(self.selectedRangeLength()) == 6

        textEditing.updateText(with: "Watch er attack videos together and discuss strategy.")
        expect(self.cursorOffset()) == 6
        expect(self.selectedRangeLength()) == 2
    }

    /// test that text selection is truncated and moved when the beginning of the selection is changed
    func testThatTextSelectionIsTruncatedAndMovedWhenTheBeginningOfTheSelectionIsChanged() {
        textEditing.textView?.text = "Watch Bugger attack videos together and discuss strategy."
        textEditing.textView?.becomeFirstResponder()
        moveCursorRelativeToBeginning(with: 6, length: 6)
        expect(self.cursorOffset()) == 6
        expect(self.selectedRangeLength()) == 6

        textEditing.updateText(with: "Watching some tiger attack videos together and discuss strategy.")
        expect(self.cursorOffset()) == 16
        expect(self.selectedRangeLength()) == 3
    }

    /// test that cursor does not move when the exact selection is removed
    func testThatCursorDoesNotMoveWhenTheExactSelectionIsRemoved() {
        textEditing.textView?.text = "Watch Bugger attack videos together and discuss strategy."
        textEditing.textView?.becomeFirstResponder()
        moveCursorRelativeToBeginning(with: 6, length: 6)
        expect(self.cursorOffset()) == 6
        expect(self.selectedRangeLength()) == 6

        textEditing.updateText(with: "Watch attack videos together and discuss strategy.")
        expect(self.cursorOffset()) == 6
        expect(self.selectedRangeLength()) == 0
    }

    /// test that cursor is moved when entire selection is removed
    func testThatCursorIsMovedWhenEntireSelectionIsRemoved() {
        textEditing.textView?.text = "Watch Bugger attack videos together and discuss strategy."
        textEditing.textView?.becomeFirstResponder()
        moveCursorRelativeToBeginning(with: 6, length: 6)
        expect(self.cursorOffset()) == 6
        expect(self.selectedRangeLength()) == 6

        textEditing.updateText(with: "Wattack videos together and discuss strategy.")
        expect(self.cursorOffset()) == 3
        expect(self.selectedRangeLength()) == 0
    }

    /// test that cursor is moved when entire selection is changed
    func testThatCursorIsMovedWhenEntireSelectionIsChanged() {
        textEditing.textView?.text = "Watch Bugger attack videos together and discuss strategy."
        textEditing.textView?.becomeFirstResponder()
        moveCursorRelativeToBeginning(with: 6, length: 6)
        expect(self.cursorOffset()) == 6
        expect(self.selectedRangeLength()) == 6

        textEditing.updateText(with: "Watching attack videos together and discuss strategy.")
        expect(self.cursorOffset()) == 8
        expect(self.selectedRangeLength()) == 0
    }

}


// MARK: - Private functions

private extension TextEditingSpec {

    private func cursorOffset() -&gt; Int {
        guard let textView = textEditing.textView, selectedRange = textView.selectedTextRange else { return 0 }
        return textView.offsetFromPosition(textView.beginningOfDocument, toPosition: selectedRange.start)
    }

    private func selectedRangeLength() -&gt; Int {
        guard let textView = textEditing.textView, selectedRange = textView.selectedTextRange else { return 0 }
        return textView.offsetFromPosition(textView.beginningOfDocument, toPosition: selectedRange.end) - cursorOffset()
    }

    private func moveCursorRelativeToBeginning(with offset: Int, length: Int = 0) {
        guard let textView = textEditing.textView, startPosition = textView.positionFromPosition(textView.beginningOfDocument, offset: offset), endPosition = textView.positionFromPosition(startPosition, offset: length) else { return }
        textView.selectedTextRange = textView.textRangeFromPosition(startPosition, toPosition: endPosition)
    }

}

And in case it is easier to consume, I created a Gist with all of the code.

Edit: Since writing this, I decided to pull all of this code into a simple library: TextMagic.


Installing on iOS 10 with Xcode 7

Like many developers, I was anxious to install iOS 10 on my devices. This summer, I went all in and installed iOS 10 beta on my primary iPhone, iPad, as well as watchOS 3 beta on my Apple Watch. I have had remarkably few issues, but one of the major problems was installing apps that I still needed to work on that needed to be shipped before iOS 10 came out.

The problem

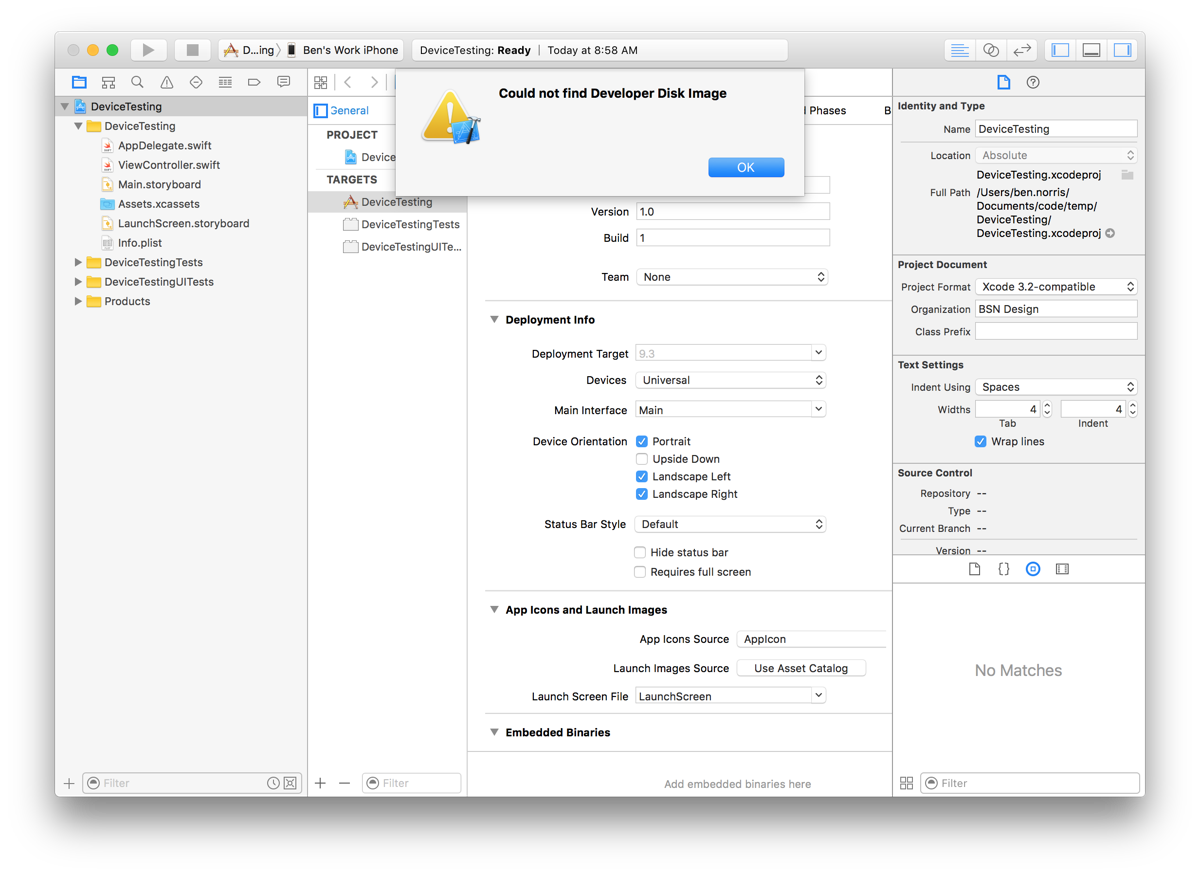
By default, you cannot install an app from Xcode 7 on a device running iOS 10. You will see an error that reads, “Could not find Developer Disk Image” as shown below.

Xcode 7 Error iOS 10

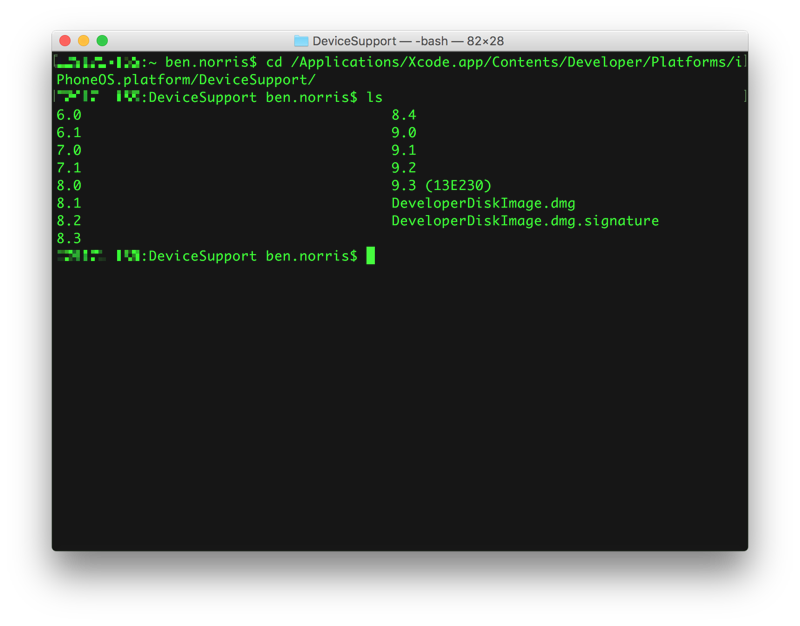
The problem is that Xcode 7 does not have support for iOS 10. Using Terminal, you can easily see which operating systems Xcode is able to support.

$ cd /Applications/Xcode.app/Content/Developer/Platforms/iPhoneOS.platform/DeviceSupport
$ ls
Xcode device support

The solution

In order for Xcode 7 to install apps on your device running iOS 10, you first need to make sure that it works with Xcode 8. Download the beta, and open a project with your device connected. Typically, you will need to wait for the symbol files to install, and then you should be able to install. In some cases, restarting your device is necessary, or even resetting the network settings (Settings -> General -> Reset -> Reset Network Settings).

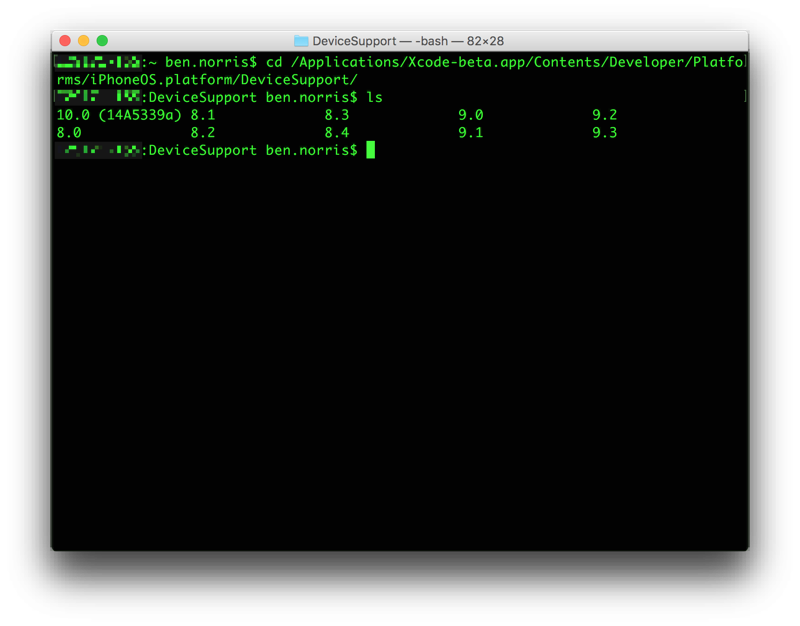
Once that it working, you can look in the Xcode beta device support folder to find iOS 10 support.

Xcode beta device support

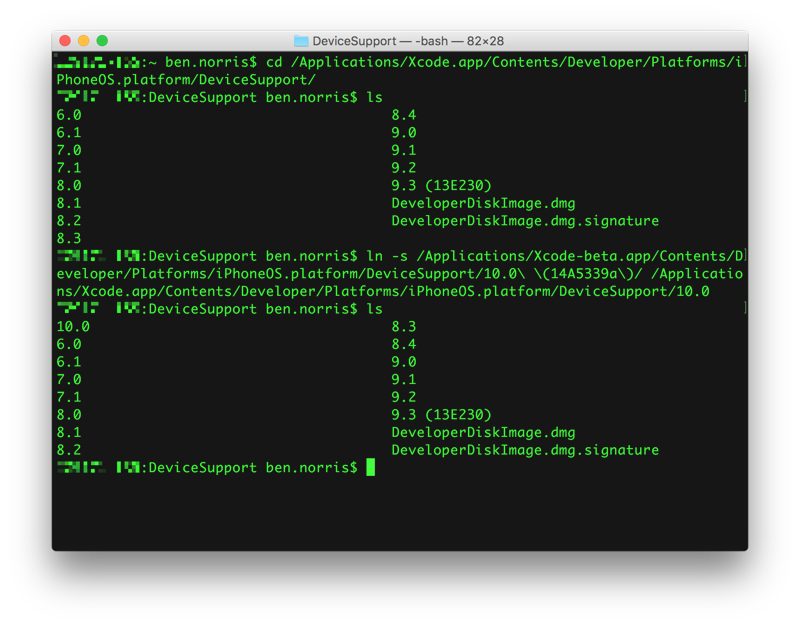
There are a couple options to give Xcode 7 the information that it needs. You could copy over the folder containing 10.0 support, but the simplest option is to create a symbolic link using the ln command in Terminal (documentation). As you type this out in Terminal, be sure to use Tab to help autocomplete the directory names in order to avoid typos. And naturally, if either Xcode app is in a different place, or the exact version of iOS 10 is different, you will make adjustments for your environment.

$ ln -s
   /Applications/Xcode-beta.app/Contents/Developer/Platforms/iPhoneOS.platform/DeviceSupport/10.0\ \(14A5339a\)/
   /Applications/Xcode.app/Contents/Developer/Platforms/iPhoneOS.platform/DeviceSupport/10.0
Xcode device support with link

After adding the link, you will need to quit and restart Xcode 7. Connect your iOS 10 device, and you should now be able to install and run your app!

Xcode 7 running on iOS 10

🌀 Lopsided relationships

Since deciding that I wanted to change careers to become a full-time developer, I have started listening to a number of podcasts. Some of my favorites are Under the Radar, the spiritual successor to my previous favorite Developing Perspective, Core Intuition, and Release Notes. There are many others that I have enjoyed off and on, including the Accidental Tech Podcast and The Talk Show, as well as some new ones I am loving, such as Runtime and Canvas. I am not sure how many hours of podcasts I have listened to, but I know that Overcast has saved me an extra 46 hours from Smart Speed alone, if that tells you anything.

One of the interesting things about listening to podcasts is that you spend hours and hours listening to someone share their thoughts and feelings on issues that are important in your life. You start to feel as if you know these people from having spent so much time with them. And since most friendships come from spending time together, you begin to feel as if you are friends.

But there is a problem.

The person on the other end of this relationship does not know you at all. They have no idea that they have spent countless hours with you. From their perspective, there is no relationship.

I had an experience recently where I was on the other end of this phenomenon. In addition to my day job as an iOS developer, I work at DevMountain, a coding bootcamp here in Utah, teaching iOS development. Many of the lessons that I have given were recorded, and current students watch those recordings as part of their curriculum. Over the past few weeks, I have had a few students come up and talk to me. They both said something to the effect of, “I feel like I know you from watching all your videos.” I had to chuckle when I realized that I had an lopsided relationship with these students.

My mind was taken back to WWDC 2015, when I had the chance to meet _David Smith, the man behind Developing Perspective. We got to chat for just a minute, and I told him how much his podcast and his willingness to share what he has learned have helped me in my own development career. It was a highlight of the conference for me.

Meeting David Smith

Caleb Hicks, David Smith, Joshua Howland, and me

From these difference experiences, and from talking with other people, I have some thoughts about how to handle meeting someone with whom you are in one of these lopsided relationships. If you are on the side that believes that you are friends, start with a brief statement explaining how you know the other person. That can go a long way to alleviate an otherwise awkward encounter. If you are on the oblivious side, do your best to make the other person feel comfortable. Recognize that the person who is meeting you feels vulnerable and probably a little intimidated. If you are both introverted developers, chances are neither of you are particularly good at interpersonal interactions, so you will both be awkward together, and that is ok.

However these relationships form, they can turn into real, meaningful relationships with just a little effort. Almost everyone who produces work that you admire is just a normal, friendly person and would appreciate you saying a kind word letting them know what you appreciate about them. Next time you see someone in a lopsided relationship with you, go up and introduce yourself!


Retrieving iOS shared web credentials

The problem

One of the most annoying interactions with any app or service is logging in. None of us likes having to remember usernames and passwords, and often they are difficult to type in. Even if they are easy, it is never what you actually want to do. You are accessing an app or service in order to accomplish a task, and logging in is a barrier to success. However, none of us want to feel like our sensitive information is not secure, so logging in is something of a necessary evil.

The solution

One thing that you can do as a developer is to make this experience as simple and painless as possible. One option, which I plan to discuss in the future, is to integrate with 1Password. This is a popular password management app, and integration is quite simple.

Another approach is what I want to cover today: integrating with Shared Web Credentials, or from a user’s perspective, integrating with Safari saved passwords. This is available since iOS 8, and is an effective way to simplify life for your users. You should read the official documentation, but I will go through the steps that I did in order to retrieve passwords successfully. In a future post, I will address creating an account and saving a new password.

The steps

  1. Add entitlement and configure app
  2. Upload site association file to server
  3. Add password to Safari on Simulator or device
  4. Add code to retrieve password
  5. Run app

Entitlement

Xcode does a great job of simplifying the process of adding entitlements. In order to use shared web credentials, you need to enable the Associated Domains entitlement:

Associated domains

Then in place of example.com, you need to put your domain. Read through the documentation for this section to make sure that you do not miss anything.

Site association file

In order for the association to work, you have to upload a simple JSON file to your server. Even if you do not have a web app that users will sign in to, as long as you have a website for your app, you can upload the file and make it easier for your users to log in on additional devices. The file should be named apple-app-site-association with no extension, and is simple JSON. It should look like this:

{
  "webcredentials": {
    "apps": [
      "D3KQX62K1A.com.example.DemoApp"
    ]
  }
}

Inside the apps array, you should list all of the bundle identifiers for apps that should be able to share passwords from this site. The prefix to the bundle identifier is usually your Team ID. To be sure, pull up the app in developer.apple.com and copy the prefix from the App ID information.

App prefix

Safari password

Since we are focusing on retrieving passwords, and not saving them from the app, it will make testing easier to manually add the password to the device you are going to test on. I will include instructions for using the Simulator, but the same basic steps apply if you are using a physical device.

  1. Open the Settings app
  2. Tap on “Safari”
  3. Tap on “Passwords”
  4. Enter 1234 for the passcode
  5. Tap on “Add Password”
  6. Enter your website and a user name and password

Safari passwords

Code

There are many approaches to retrieving the shared password. The method I have chosen is to make the call to retrieve the shared password when the user taps on the username or password field in the login form. That way, it is not as jarring for the user when first navigating to the form, but it is still helpful at the moment the user wants to take action.

The actual code for retrieving the credentials is fairly simple. Here is an example with a completion closure that returns an optional username and password.

func requestSharedPassword(completion: (username: String?, password: String?) -&gt; ()) {
  SecRequestSharedWebCredential(nil, nil) { credentials, error in
    dispatch_async(dispatch_get_main_queue()) {
      guard error == nil else {
        completion(username: nil, password: nil)
        return
      }
      guard let unwrappedCredentials = credentials else {
        completion(username: nil, password: nil)
        return
      }
      let arrayCredentials = unwrappedCredentials as [AnyObject]
      guard let typedCredentials = arrayCredentials as? [[String: AnyObject]] else {
        completion(username: nil, password: nil)
        return
      }
      guard let credential = typedCredentials.first else {
        completion(username: nil, password: nil)
        return
      }
      guard let username = credential[String(kSecAttrAccount)] as? String,
                password = credential[String(kSecSharedPassword)] as? String else {
        completion(username: nil, password: nil)
        return
      }
      completion(username: username, password: password)
    }
  }
}

func textFieldDidBeginEditing(textField: UITextField) {
  requestSharedPassword { username, password in
    guard let username = username, password = password else { return }
    usernameField.text = username
    passwordField.text = password
    self.submit()
  }
}

Execution

Finally, with the code in place, you can run the app again. When the user taps in the username or password field, call your requestSharedPassword function, and if everything is set up properly, you will see something like this example from an app I am currently working on:

Shared credentials

Summary

And that is it! These steps really are simple and straightforward, but the effect on the user experience of your app is tremendous.


Leveling up with automated testing

As I approached the end of 2015, I was thinking of my goals for 2016, and how I wanted to grow and improve as a developer. One of the main areas in which I felt like I was lacking was in automated testing. That is a topic that many developers talk about, usually with a slight sense of shame, or a tinge of regret. There is almost always a tacit acknowledgement that it is important, and we should be doing it, but for many reasons, it is not happening.

As an iOS development community, we seem to largely have not yet embraced testing. There are many notable developers who are huge proponents of testing, but there seem to be even more who are not. I was talking with a Ruby developer about why that is. He commented that without tests, he has no way to know if his code is working—there is nothing he can easily pull up to see the code in action. With iOS development, we launch the simulator, and immediately conduct a manual test. So writing automated tests feels unnecessary.

One of the most common refrains that I hear is that writing automated tests feels like writing the app a second time, but with no obvious value to the end user. The conclusion to that line of thinking is that the time would be better spent building out more features that do benefit customers.

One experience that I had in late 2015 started to change my thinking about this. I participated in a Startup Weekend event in Salt Lake City, and was on a team that built a bowling app for the then-yet-to-be-released Apple TV. I had never built a game before, and I was tasked with creating the actual game play—the bowling lane, pin, balls, and logic of the game. After diving into SceneKit and figuring out how to get the ball to go down the lane and knock over pins, I had to implement scoring logic, and reset the pins correctly based on the results of the frame. The logic was fairly simple, up until the tenth frame. I realized that it was going to be extremely difficult to manually test all of the different options. So I wrote a suite of automated tests to make sure that everything worked properly. That suite saved me a number of times as I would make a tweak for something like a strike or a spare, only to find out that I had broken part of the tenth frame logic.

At the beginning of 2016, I started on a new team at my day job, and began working on a new project, Align. We started with a quick prototype that had no automated testing. But as we began work on the real app, I took the time to set up a continuous integration build with Jenkins and Fastlane that would run all of my tests and push to iTunes Connect for Test Flight. Then I began writing tests for every single thing that I implemented.

As I worked to maintain high test coverage, I found that writing automated tests, and thinking about writing automated tests did at least three things for me:

  1. Knowing that I was writing tests made me write my code to be more testable, which helped it to be more modular and self-contained
  2. Actually writing the tests helped me think of edge cases and error handling that I had not yet considered
  3. Having tests already written helped me find small regressions as I made changes in the app

I worked hard to make sure that all non-UI code was as completely covered with unit tests as possible. And then I wrote UI tests both to test the UI code, and also to serve as integration tests for the whole app. There were a number of configuration things that I had to set up, and I hope to discuss those in future posts. Having a comprehensive suite of unit and UI tests has already saved me from some major bugs. I have made significant changes to the architecture and organization of the project, and have been able to verify within seconds where I had introduced problems in the app, or verify with confidence that everything was still working.

One practice that I have been pushing myself to adopt more is test-driven development or TDD. This has been most useful when discovering or hearing about a bug in the app. I write a failing test that highlights where the error is, and then write the code to fix the behavior. That way, I know when it is fixed, and that it will not break again in the future. When writing new code, TDD is often more difficult. I will create the basic objects that I need, and then write test methods whose names describe the behavior I want to have in the app. I will then add the property and functions necessary to define the API and write failing tests that illustrate what I expect to happen. Finally, I actually fill our the functions so that the tests pass. Invariably, there is some back and forth as I tweak the tests and tweak the code before everything is working properly.

Having a project with a robust test suite is such a comfort that I never want to go back. When I work on other projects that do not have tests in them, I start to get anxious and worry that I am breaking things without knowing about it. I have found that starting by adding some simple tests around any new behavior, or to illustrate bugs that are found is a great way to get started. You do not have to have the perfect project with complete test coverage in order to start reaping the benefits of automated tests. I look forward to learning more about testing and sharing more of what I am learning along the way.


Writing reusable code

At the beginning of this year, I was put on a new team at work. We had the chance to a build a project completely from scratch. When I joined the team, they had already spent a few months interviewing potential customers and learning about the market, and were ready to build a prototype. I was tasked with creating a quick, simple version of the app that stored all data locally. I knew that I would be rebuilding the app a couple times, or at least refactoring major portions of the app. So I set out to build portions of the app in ways that I could easily reuse them multiple times, and across multiple projects.

One thing that has made this easier is that my employer has been generous in allowing large portions of my work to be open-source. As I worked on my project, I was conscious to separate app-specific code from reusable pieces that could be made into frameworks or libraries.

One of the first areas that I tackled was to create a network stack built on top of NSURLSession that provided a simple interface to make network requests. The end result is somewhat specific to our projects at O.C. Tanner, but we made it open-source in case it is useful to anyone else: ios-network-stack.

Since then, I have made a number of libraries that I use across different apps. Most of the libraries are not to the level that I would like yet—I need to add automated tests, better code documentation, and useful readme files. But I have learned a number of things in creating and using these libraries, and thought it would be useful to go through some of the pros and cons.

Cons

Dependency management

For a long time, I resisted adding any dependencies to my projects. It felt much simpler to just focus on the project at hand, and build anything that was needed specific to the project. Dealing with a system such as Cocoapods or Carthage felt like too much overhead. Part of my reaction came from working on projects where previous developers had pulled in so many dependencies that the project became unwieldy and difficult to update and maintain. We experimented with different approaches and finally landed on using Carthage and Git submodules, which I described earlier.

Part of the key in managing dependencies reliably is being able to choose when to update those dependencies. If your code changes out from under you when you are not expecting it, development becomes much more difficult. Using Carthage and submodules means that I decide exactly when to update, and can choose which version of a given dependency to keep in my project. So if I need to use an older version for compatibility issues, or an experimental branch, that is easy to do.

Extra time cost

One of the biggest frustrations with adding dependencies is the additional time investment at the beginning of a project. Especially if something goes wrong, it can be extremely frustrating to want to just start coding, and instead have to deal with dependency problems.

Again, this is one of the reasons that I have decided on the system that I currently use. I use Tower as a Git client, and it has made working with submodules extremely simple. If someone needs to check out the repo, they can just initialize the submodules, and they will have the entire project set up and ready to go. When starting a project, it is a simple process to set up the project, although there are a number of steps that can feel intimidating at first.

Maintenance

One significant issue that you have to be aware of when creating open-source projects is the possibility that they will become successful. Once an open-source project starts being used by more people, and especially when they start contributing, it requires much more of a time investment. There will come pull requests to review and merge, issues to triage, and questions to answer. Hopefully this also comes with the benefit of having the code improved by getting more real-word usage, and contributions back to the project. But as the project creator, you have to evaluate whether the benefit will be worth the cost.

Pros

Quicker project spin up

In practice, I have found that the time balance comes out in favor of using dependencies. I only have a few third-party libraries that I am pulling in—many of my dependencies are internal libraries that I maintain and share across my projects. Splitting that code out into reusable libraries means that in each project, I can focus on the app-specific logic. I have been able to get new projects started much faster as a result.

Increased testability

Since I am using mainly internal libraries, this is code that I would have written anyway for each app. But since I am creating libraries, by necessity, it is decoupled from app logic, and more modular, making it easier to test. This has the benefit of creating more maintainable code and spending less time down the road debugging and fixing issues.

Community contribution

Even though many of my frameworks and libraries are only used by myself at this point, the fact that I am creating them as open-source projects means that they are available to the community. As I find interesting approaches to problems, or identify areas of boilerplate code that can easily be reused, it is a great feeling knowing that I am making it possible for others to benefit from that as well.

Of course, since I am still enjoying the luxury of obscurity, I do not feel the pressure of having all of my projects perfectly documented, tested, and maintained. I still plan on working toward that goal, but I know I have time. At this point, creating reusable libraries has given me great personal benefit, and I look forward to helping others as well in the future.


iOS 10 and my apps

After consuming much of WWDC last week, I wanted to take a few minutes and consider how my apps could be affected by the new announcements. Since I mostly sat in my office at home and watched live session videos, some effort is required to make sure that the videos can translate into action and improvement. I thought I would take each of my active projects in turn, or rather active and semi-active projects, and consider the state of the app, and how I might incorporate some new technologies. Most of this will be “thinking out loud” so that I can try and process some of what I learned.

Align

Align is a new app that I am helping create in my day job at Tanner Labs. Our focus is to make managers better by leveraging the one-on-one. The tool will start out simple, as a way for managers to track one-on-ones and help them prepare, execute, and follow up. We will be launching this with both an iOS app and a web app, built on Firebase as a back end.

SiriKit

One of the first thing that I thought of is the possibilities of integrating with Siri. As Apple expands Siri to be integrated with third-party apps, they are starting with six domains: messaging, voice/video calls, payment, ride sharing, workouts, and photo search. Of those, I think that messaging could potentially be a good fit.

Comments

One of the keys with a one-on-one is the comments that can go back and forth between the manager and team member leading up to the meeting. That can help the team member to feel engaged and empowered to affect the content of the meeting, and to avoid anxiety or the “called-to-the-principal’s-office” feeling. Part of the challenge with integrating with SiriKit would be identifying which one-on-one to add comments to, so I think I would either have to default to the next one coming up, or consider scheduling one through the interaction. This kind of experience is not exactly what Apple seemed to have in mind, so I will have to explore it more and see how it might feel.

Coaching Items

An interaction that we have considered for Align is the ability for a manager to create a coaching item for a team member. This would be essentially a note that the manager creates to follow up with the team member on some point, whether to praise and recognize or to provide correction. The idea is that it should be an extremely quick interaction to capture something that would then be discussed later with the team member. This was actually one of the first things that came to my mind with SiriKit and Align, but as I think about it more, I think that it might not be the right fit. For the messaging domain, Siri is expecting to get a recipient from the user. The voice prompt would be something like, “Tell John using Align that…” The problem that I see is that the resulting action would be to create a coaching item for the manager to discuss with the employee later. It makes sense as a use case, but we will have to see if the interaction feels natural.

iMessage App

Making Messages into a platform allows for much richer interactions that start while messaging with someone, and never leave that experience. I anticipate that some of the best implementations of this will be collaborative experiences, where the participants can go back and forth on something before it is finalized. This seems like it might be a great fit for preparing for a one-on-one. It would allow for a manager to send a team member the proposed agenda and other details for the one-on-one, and for the team member to have an easy way to provide input, or make suggestions to the agenda. This kind of interaction would require the team member to have the app as well, so we may or may not want to pursue this, but I think it could be powerful.

Notification Service Extension

With iOS 10, notifications are now a powerful interaction point, and I want to make sure that we take full advantage of this. We will need to think through the design of a custom UI to show with notifications. We will have different kinds of notifications that users will receive, and each will have to be considered separately. One of the main things that should be featured in our notifications is the images of the team members involved in the notification. That will make it easy for a user to connect with the information and to encourage a personal approach.

Search

In iOS 9, Spotlight integration was added, and this is definitely a feature that we should take advantage of. It should be simple for a user to find their one-on-one information by searching on the phone. With the addition of app search integration into Spotlight, this becomes even more compelling. As we build search into the app, I need to make sure that we do it in a way that we can easily facilitate this powerful interaction.

watchOS 3

I have been planning on building some kind of Apple Watch app, although I am not sure exactly what the focus should be. However, with some of the changes in watchOS 3, I think the focus is much clearer. Since apps will stay “active” for eight minutes after launching them, it becomes much more feasible to have a Watch app be a reference point. If you are in a one-on-one, it could be powerful to have your agenda easily glanceable on your wrist so that you can be checking as you go to make sure that you both stay on time with the meeting, and cover everything you intended. A natural complication would be to see the next or current one-on-one, and that would make it easy to launch the app and be ready to execute the one-on-one. An implication of that interaction could be to make the agenda points completable, so that you could check them off as you go, in order to remember what is left. We will have to see where that goes.

Final Thoughts

Many of the system-level integrations in iOS 10 are focused around location- and communication-type apps, which does not exactly fit Align. For example, it would not make sense for Align to become the preferred messaging app for communicating with someone, and so I would not want to provide that information to Contacts. I need to make sure that I appropriately tag any input fields so that I can get meaningful Quick Type suggestions for things like people, contact information, or locations. I should also take advantage of the Universal Clipboard, and make sure that I am a good citizen there. I think that is about it for Align. Good stuff!

Pointedly

Pointedly is actually my first app released to the App Store, and continues to be one of my favorites to work on. It is a simple app to keep score in board games, or card games, or anything else that could use tracking. In many ways, it has served the purpose of being a playground for me to try out new technologies as they make sense for the app. It is currently a stand-alone app on the iPhone with the data not synced or shared in any way.

CloudKit Sharing

This is huge for me. I have been wanting to build a back-end syncing mechanism for Pointedly so that you can easily track all of your games across your devices, but I have not implemented one yet. Part of the reason was that I wanted to be able to share games, and had not decided on the easiest way to do that yet. This feature is exactly what I was hoping for in CloudKit, without even thinking of it as a possibility. I had wanted to explore different options for collaborating on a pointcard, such as having it be public, and allowing anyone to join, or sharing with an individual. From the session explaining this, I think that I can accomplish exactly what I want while keeping the data private and only shared as needed. You can either share with a specified individual, or else anyone with the link so that you could post the link in some place like Slack for anyone to join that had access. There are still a number of things that I need to think through here, like how to share the players that are involved in a game, but this is definitely the answer for me.

iMessage App

I am not completely sure about this yet, but I have been thinking that it would be fun to send someone a pointcard in Messages, and collaborate with them that way. It seems that there are a limited set of scenarios when this would make sense, and most of them would probably be better served by using CloudKit Sharing from within the app, but it remains an intriguing possibility. This is also a technology that I want to understand better, so in some ways I want to explore adding this just to gain experience with it.

watchOS 3

Now that Apple Watch will have directly CloudKit support, and I will probably be adding CloudKit, this makes more sense. Combined with the enhancements to keep the app running for longer, using your watch to quickly enter the score for a game feels like a great feature. The crucial thing would be to figure out how to allow for a score entry that can easily be done in under two seconds. You have to select the player and input the score in the way that makes sense and then easily get an overview of the game progress. I will have to decide about creating a pointcard, and whether to allow that on the watch, or to require the iPhone for that. It seems like it would make more sense on the iPhone, but if I can find a fast way to do it on the watch, that would be nice. Finally, I think I would definitely want to use Handoff and encourage the user to go back to the phone to share the results at the end of the game.

tvOS 10

No customers have asked for this, and it would not make too much sense to invest a lot of time in developing this, but again, since tvOS supports CloudKit, it should be fairly simple to create a version to run on the Apple TV. I would have to possibly rethink some of the interactions to make them simpler, and consider having different views for the TV. For example, it might make more sense to have the Apple TV version be a display of the score that is entered from people’s iPhones or Apple Watches. But since they would all be getting their data from the same place, this could be compelling. Maybe I could develop simple charts that show the progress of the game in a meaningful way, or simply have a fun visualization of the current status of the game. It is at least something to consider.

Final Thoughts

Most of the newly announced technologies in iOS 10 are not a great fit for Pointedly. One of my goals is to keep the app extremely focused and avoid letting it become bloated by trying accommodate everyone’s needs or adding features gratuitously.

Whimmy

Whimmy is an app I created together with Stotion to make it easier to get together with the people that matter in your life. You can send an invite with a fuse that fills up once the capacity is reached and avoid the back-and-forth of text or email. The app is on iPhone, Apple Watch, web, and an Android beta.

SiriKit

I was so excited to hear some of the details for SiriKit because I knew it would be a great fit for Whimmy. You would not necessarily use Whimmy as your preferred messaging app to contact someone because it is more focused around events. We designed it from the beginning to streamline the process of creating and responding to invites, and integrating with Siri is a natural extension of that. My only concern is honing the experience to get all of the right information through Siri. Currently, an invite includes recipients, message, location, capacity limit, and an expiration limit. That feels like a large number of data points to capture through Siri, so we will have to see how it feels.

One of the features that we have been thinking about adding to Whimmy is the ability to comment on an event. That would make for a powerful and quick interaction to use Siri to reply to an invite, or continue the conversation. Part of the challenge would be correctly identifying the correct invite for the comment from Siri, but that is something that we could hone through testing.

Notification Service Extension

The ability to add custom UI to a notification when the user views the details is extremely exciting. For Whimmy, this would give us the ability to provide rich information when a recipient receives an invite, such as the people attending, potentially a map view of the location, and a visualization of the time remaining to respond. I love the challenge of figuring out how to build the designs that Stotion comes up with, and this would be another prime opportunity.

Custom Notification Responses

One of the demos with the advances in notifications included a user responding to an invite. The actions for the notification were: Accept, Decline, and Reply. In the Reply action, the user could send a textual reply. One of the advances this year is that in addition to the text, I could build UI to allow the user to also accept or decline the invite. This is definitely something that I want to take advantage of with Whimmy as we build the commenting feature.

iMessage App

If you already have a group message going with your friends, integrating Whimmy to create an event is a logical next step. As I mentioned earlier, we are planning to add comments to an invite, but that feature would not be needed in the context of the iMessage App version of Whimmy. You would already be chatting with your friends in Messages, and Whimmy would serve as a way for you to create an invite and easily allow your friends to respond.

It could make sense to send an invite to an individual person as well through Messages. You would want to be able to send the same invite to multiple people, so you would have to be able to choose from existing invites, or to create a new one. In some ways, this could easily feel redundant. Whimmy already allows you to send invites to people, even if they are not users of the app. I think we would need to do some user research to see how people would want to use the app.

SpriteKit

This is not a new technology, but it is newly available on the Apple Watch, and something that I think we could take advantage of in Whimmy. With the expansion of SpriteKit to be on all iOS-based platforms (iOS, watchOS, and tvOS), this is a technology that I want to become more experienced with, even in UIKit-based apps. There are a number of animations that we use in the Apple Watch app of Whimmy, particularly in notifications, and we could convert those all to SpriteKit, and expand them to the rest of the app with good results.

Final Thoughts

Whimmy has not been under active development for quite some time, but the potential is huge. I love the concept and believe in the purpose of getting people together more. It also serves as a great playground for me to experiment with different technologies and push myself as a developer. It does not make sense to invest a ton of time and effort into this app, but it is one that I really enjoy working on, and plan to consider for many of the announced changes.

Recite

Recite is an iOS app to facilitate memorizing scriptures, quotes, and other short passages. It is currently an iPhone app with an Apple Watch app, again with completely local data.

CloudKit Sharing

This is another app for which I have wanted to add some kind of syncing. I built the app for my family to use in our morning devotional, and it has worked really well for that, as long as I am home. However, since it cannot be shared, my wife is not able to use it if I am not there, and I have wanted to fix that. So I think CloudKit Sharing will be a great fit here as well.

I am currently storing content packs as downloadable in-app purchases through Apple, and have been thinking that I might change the business model a bit. If I do, the public CloudKit database might be the right place to store the data to make it easily accessible to everyone. I want to think through this more, but I feel like CloudKit will play a large role in this app moving forward.

Summary

iOS 10 and watchOS 3 provide some great opportunities for me to enhance the apps that I am working on already. It is probable that I will not be able to implement all of the ideas that I have had in this post, but this has been an extremely helpful exercise for me to consider each app in turn and think through the possible implications. I look forward to mastering some of these new technologies and adding them to my toolbelt so that I am ready to make use of them as I continue to create new apps.

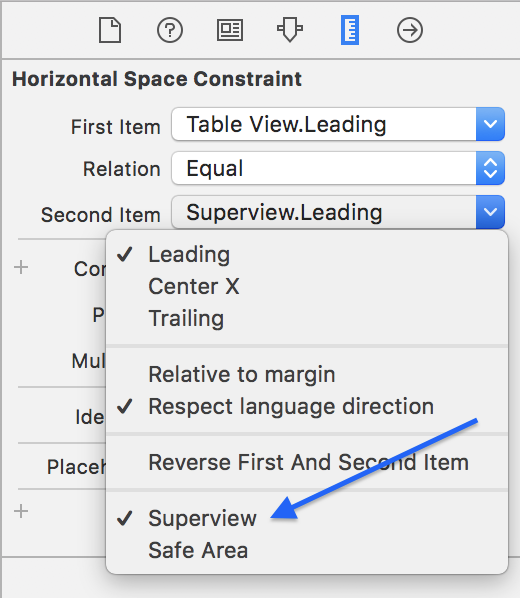
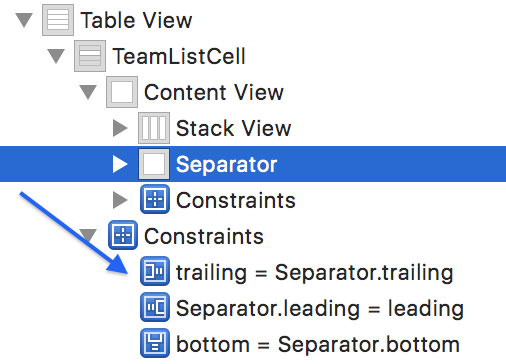
Fixing local problems with a Carthage version number

As I discussed previously, we are using Carthage and Git submodules to manage our dependencies. Since many of the frameworks that we are pulling in are frameworks that we are writing, we sometimes run into an issue where we have changed the version number of a release for a framework to be the same as a previous version. This does not happen often, but can happen if you have made a release, and then later deleted the release and the tag and made a new release pointing to a different commit.

The problem is that when you update a framework via a Carthage dependency, a local cache of the repo is saved, along with the version number tags. If you change your Cartfile to reference a version number that was previously downloaded, Carthage will use the locally cached version instead of getting the latest update from GitHub.

Solution

  1. Using Terminal, navigate to the Carthage cache.
  • cd /Users/[username]/Library/Caches/org.carthage.CarthageKit/dependencies
  1. Remove the directory matching the framework that you need to force to download.
  • rm -rf FrameworkName/
  1. Back in your project directory, update again from Carthage.
  • carthage update --no-build --use-submodules
  • Edit: carthage checkout works better for this. Thanks Tim Shadel!

Summary

Your framework will download from GitHub at whatever version number you have specified, and you should be set. This is mostly a reference for myself for the next time that I need to remember how to do this, but hopefully it can help you as well.


Using Carthage to add third-party code

In almost every project that I create, I bring in frameworks and libraries. After trying a number of different approaches to make this easier, I have landed on a system that uses Carthage, and Git submodules. The system basically comes from a post by Bart Whiteley, but I wanted to record all of the steps so that I have them in one place for my own reference.

The advantage of this system that you have all the control of submodules, while having the ease of using Carthage to keep dependencies in sync. You can easily change the version number of the dependencies in Carthage, and then commit the update to the submodule, making it easy to work across teams.

Pre-requisites

  1. Create a workspace with your project included.
  2. Set up a Cartfile with your dependencies.
  3. In Terminal, run the command carthage bootstrap --no-build --use-submodules.
    • Make sure that you have carthage installed (documentation).
    • This will clone or fetch all of your dependencies, and check them out as git submodules in your project
    • Note: You only need to run bootstrap once in your project. After that, you will run carthage update --no-build --use-submodules.

Bringing in a dependency

  1. Find the FrameworkName.xcodeproj file for the dependency in .Carthage/Checkouts and add it to your workspace.
    • Make sure that you drag the project to the far left so that it becomes a workspace project instead of a subproject under an existing project.
  2. In the General tab of your app target, add the framework to “Linked Frameworks and Libraries” by searching in the workspace.
  3. The framework should show up in your Project Navigator. Drag it to a folder according to your project organization.
  4. Add the same framework to “Embedded Binaries” in the General tab.
  5. This will probably create a duplicate entry in “Linked Frameworks and Libraries” which you should remove.
  6. Select the framework in the Project Navigator, and change the Location to “Relative to Build Products” in the File Inspector panel on the right.
  7. Edit your project file (ProjectName.xcodeproj/project.pbxproj) in a text editor.
    • In the PBXFileReference section, find the entry for your framework.
    • Edit the path property to be simply FrameworkName.framework. You will probably be removing a long, absolute path reference.
    • The sourceTree property should be set to BUILT_PRODUCTS_DIR.
  8. In the Build Settings tab of your app target, find the “Framework Search Paths” option. An entry pointing to the framework in .Carthage/Checkouts has probably been added, which you should remove.
  9. Build the project and make sure there are no errors.

Additional information

When someone else checks out the project, it is not necessary to run any carthage commands. Instead, they will update the submodules. This can be done in Terminal, if needed, using git submodule update --init.

Conclusion

It is always a challenge to find the best way to incorporate third-party code in a consistent, repeatable way that works well for individual developers as well as automated build systems. This has worked well for us, and hopefully will help you and your team as well.


The Luxury of Launching into Obscurity

As I was getting my blog ready, there was a large part of me that wanted to hold back until I had something meaningful to contribute. But there was another part of me that realized that at this point, it doesn’t matter. When I launch my blog, no one will notice. When I write a new post, I will be the only one that will care. If there are problems, or if there is something with which I am not happy, I can change it easily, and no one else will ever know.

This feeling of obscurity is simultaneously intimidating and empowering. I have already considered some of the empowering consequences, and now want to explore more of the intimidating aspects. When you know that almost no one will consume what you create, there is little incentive to deliver quickly. It can be extremely hard to build the discipline to start shipping.

So how do you conquer this?

One thing that I have learned in shipping my apps is that when you focus on creating something that is meaningful, people appreciate that. My first app, Pointedly, was a project that was part of my path in learning iOS development. I worked on it together with my 7-year-old son, and we used it often as a family, and my wife and I made decisions together about the business side of the app. Every time that we had a trade-off between making a solid business decision for ourselves or improving the user experience, we focused on the users. One example was the business model. Many people counseled me to either have a paid app, or require an in-app purchase to access all features. We decided instead to make the app completely free, and add in-app purchases to allow users to support the app with a tip. We have been pleasantly surprised that many people have been willing to give tips, and have left positive reviews.

I know that this isolated example will not hold true in all circumstances. But the lesson that I have taken away is that a focus on users will often be rewarded. Pointedly is not in a position to build a business on, and I am definitely not ready to support my family on the income from the tips, but it is a first step. The piece of the app that I hope will be the foundation for my business is a focus on users first. I firmly believe that when a business focuses on users and their needs above the needs of the business, the business will be more successful in the end.

To tie this all back together, even when you have no audience to receive your work, do your best work. Focus on improving the experience of your users, and when faced with a decision, choose your users. Start shipping, and as you ship, make sure that what you ship is work of which you can be proud. Allow the empowering effects of obscurity to drive you forward. Take advantage of the time you have to launch into obscurity, because there will come a day when you no longer have that luxury.


Finally getting started

Back in January of 2016, I had a discussion with my manager and made some goals for the year. One of my main goals was to start blogging. I have been heads down on coding for the past year and a half, and had always meant to start recording some of thoughts and contributing back to the community, but just hadn’t started yet.

Part of me felt that I needed to gain more experience and learn more that was actually worthy of being shared. But then I noticed that many of the people that I was following, and that I respected most, were sharing concepts that they were just trying out, or that they were wanting to learn. I was especially inspired by Natasha The Robot, and her bite-sized posts that clearly explained different things she was figuring out.

As I continued to try new things out, and learn more about the craft of creating iOS apps, I started compiling a list of blog topics. Over the next few months, I hope to get in a habit of capturing my process, my goals, and my learnings along the way. At the very least, I will start building a repository of knowledge for myself to easily refer back to when I forget something that I have learned. Hopefully the things that I learn and that I share will be valuable to others as well.


My own Cars moment

Anyone who has ever searched for something related to web development has run into Chris. He runs the blog CSS-Tricks, as well as Code Pen, and the podcast Shop Talk Show. He’s like your own personal Mr. Miyagi in a can—always available to pop out when you need advice. He is now one of my heroes as he has unknowingly become something of a mentor on my path to front-end web development competence.

Shop Talk Show Episode Sketchnote

He was scheduled to be the second keynote address at the recent CSS Dev Conference, which I was invited to sketchnote. One of my goals in attending that conference was to meet Zoe Gillenwater, which I [wrote about]({% post_url 2013-12-07-meeting-your-heroes %}) recently. My other goal was to meet Chris Coyier. I started listening to and sketchnoting episodes of the Shop Talk Show a few weeks prior to the conference. One of huge interesting side effects of listening to someone over the course of a few hours is that you feel like you get to know them a bit. So I was excited to meet the man behind the voice.

The first night of the conference included a little history lesson on the Stanley Hotel. I went to the table where Chris was sitting and sat down next to him, and said something like, “You’re Chris, right?” Very kindly, he replied, “Hey, it’s Ben, right?” And my jaw dropped. The Chris Coyier knew who I was? I was stunned. I stammered out, “You know who I am!?” With great grace, he refrained from bursting out laughing, and pointed to the big name tag hanging around my neck. I started laughing at that point, and felt pretty foolish. Since I have four kids, and have seen the movie quite a few times, the scene from Cars flashed in my mind when the old rusty car with his name on his license plate freaks out that Lightning McQueen knows his name. Yeah, I was cool like him.

Fred from Disney&rsquo;s Cars

As Chris and I started chatting for a minute and I mentioned that I was there to sketchnote the conference, he recognized me from the sketchnotes I’ve done from Shop Talk Show. We chatted about him having lunch with the legendary Mike Rohde, the man who coined the term “sketchnotes” and who lives in Milwaukee as well. Over the course of the conference, we chatted a few more times, and I was impressed to find him a genuine, down-to-earth guy, despite being ridiculously famous in this little web-development world of ours (top nerd!?). And even better for me, he seemed remarkably willing to forget our meeting and still treat me professionally.